This is the same help that ships inside the app, under Help → ArtFetcher Help.
This documentation covers searching the provider collections, watching a search as it runs, choosing what to keep and moving it into your library, and where downloaded images are stored and what they are named. It also covers the application settings, the licences the images carry and what you may do with them, and what to do when a search goes wrong.
ArtFetcher finds high-resolution images of public-domain paintings. You give it an artist and a title; it asks museum and cultural-heritage collections around the world whether they hold that painting, downloads the best versions it finds, and lets you keep the ones you want in your own library.
Nothing else is needed to use it. There is no account to create, no credit card details to enter, no in-app purchase.
Open the Search window with File → Search. There is also a shortcut that works from any macOS application (set to ⇧⌘8 by default) so you can go from whatever you are reading straight to a search. Settings → Search is where you can pick a different key combination.
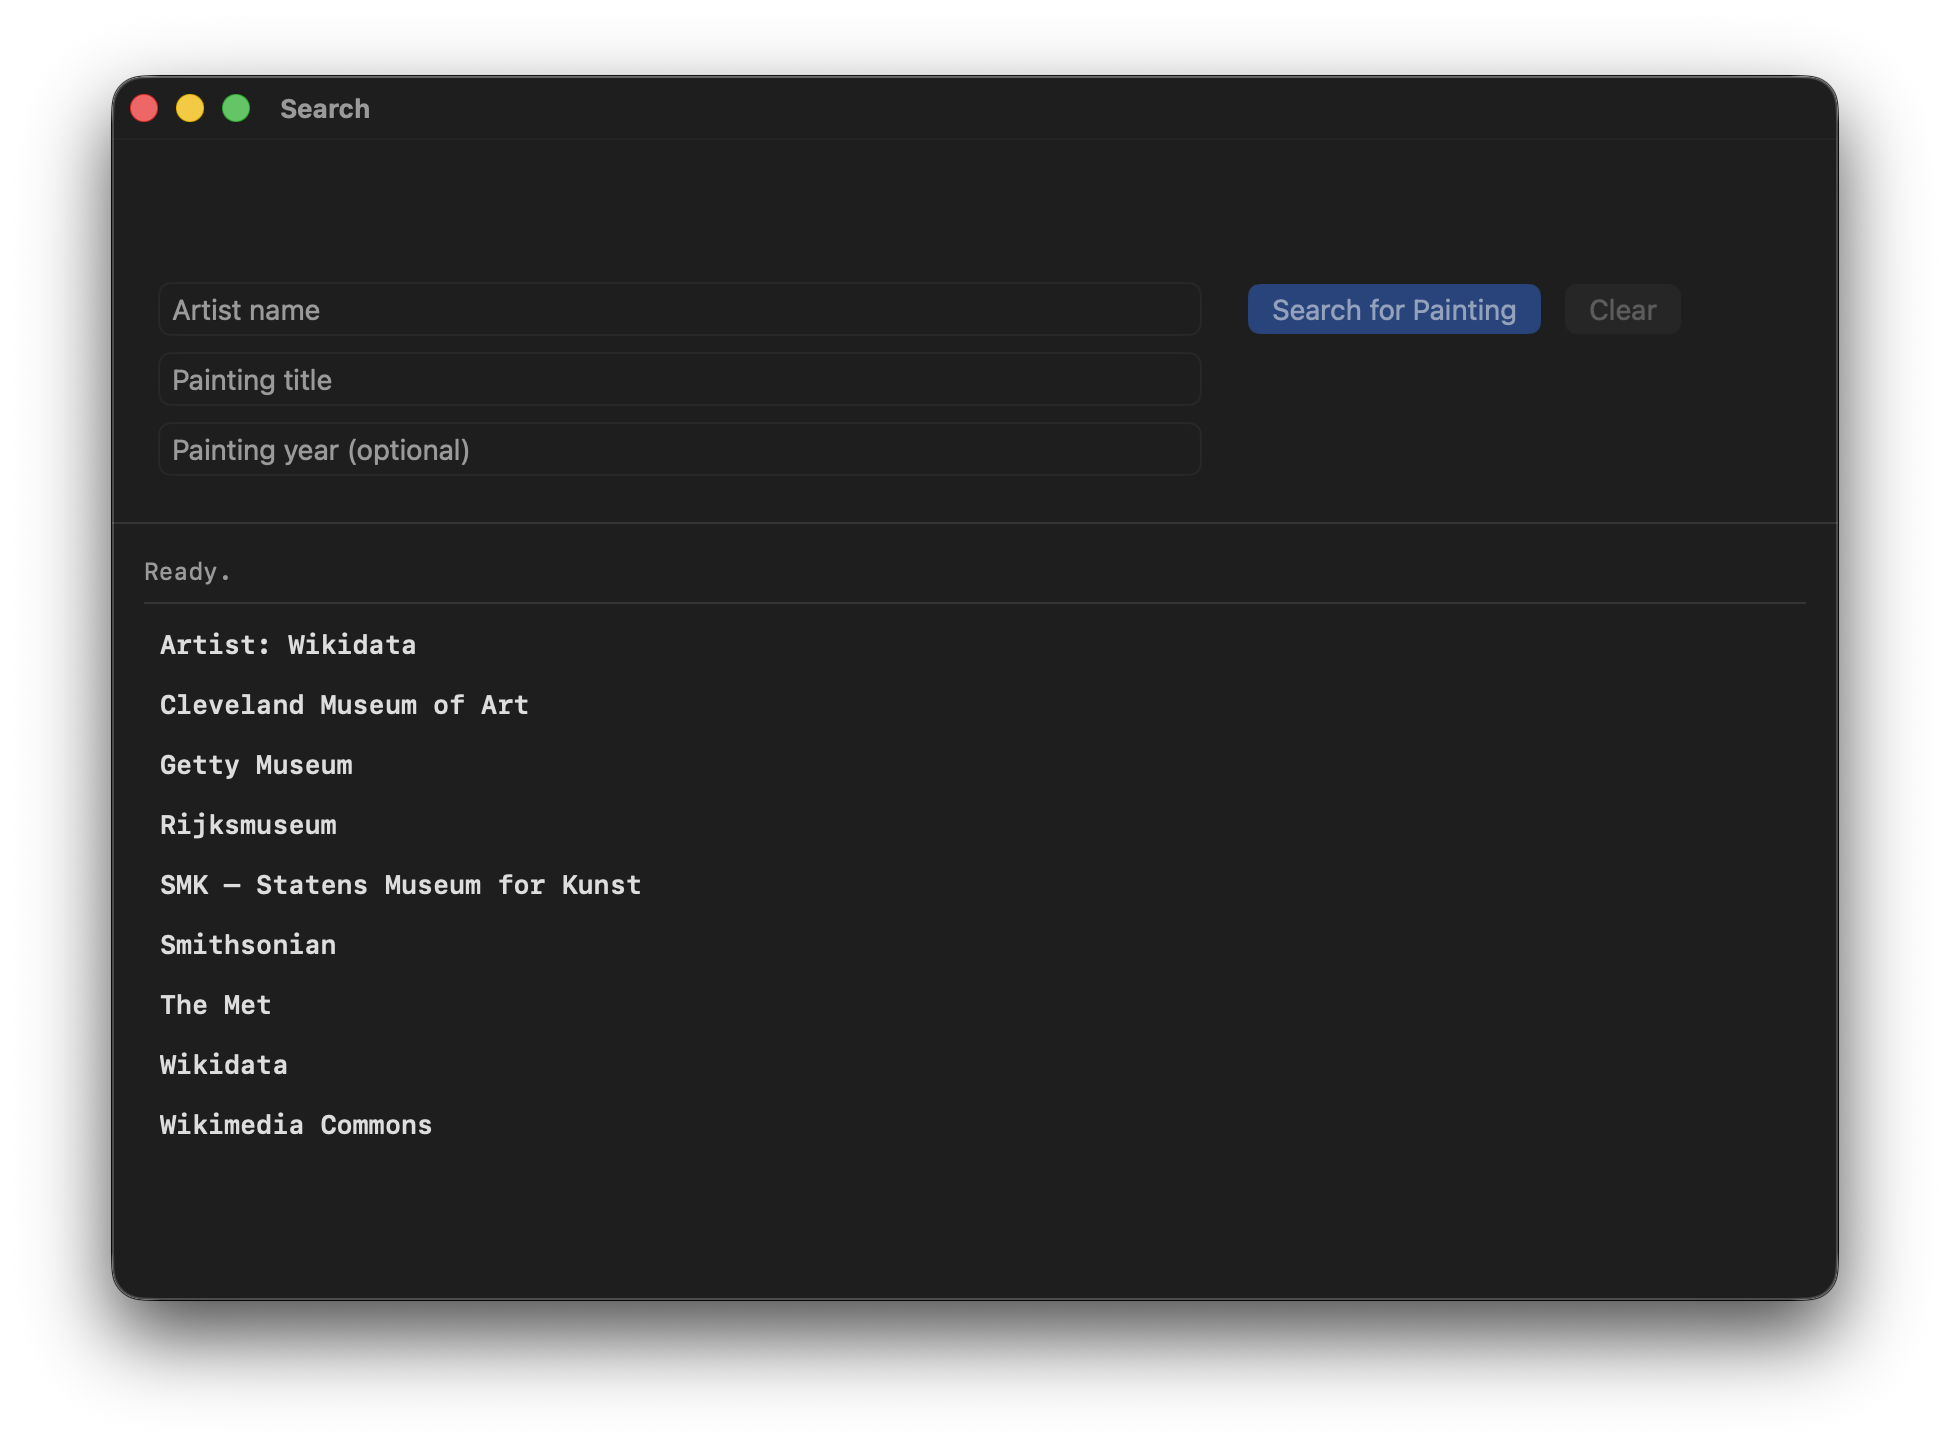
The Search window contains an upper search pane and a lower status pane. The search pane is split in two: an image gallery on the left and the search fields on the right.
The gallery is your working area. It is where you collect pictures of the paintings you're interested in. There are three ways to do this:
The first way is using Screen Capture. Press its shortcut (set to ⇧⌘9 by default), or choose Screen Capture from the menu bar item (turned on in Settings → General). When you do this, the screen dims and the instructions Drag to capture. Click without dragging to cancel appears. Click and drag a rectangle around the painting. This works on any display.
The capture is written as a PNG into the folder named in Settings → Search, and it appears in the gallery.
The screen capture shortcut is system-wide, however it only works when ArtFetcher is running. We suggest you enable Open ArtFetcher at login in Settings → General.
macOS asks for Screen Recording permission the first time you capture. ArtFetcher cannot capture the screen until you grant permission, and the app may need relaunching afterwards for the grant to take effect.
The second way is to drag and drop an image directly into the gallery. This can be straight from a web browser, the Photos app, Messages, Finder or any application that allows you to drag an image. You can also drag an image onto ArtFetcher's Dock icon.
The third way is for ArtFetcher to automatically pick up pictures that appear in a folder.
Settings → Watched Folders lists folders it keeps
an eye on; anything appearing in one of them whose filename starts with
Screenshot is added to the gallery. That is the naming macOS itself
uses, so pointing ArtFetcher at wherever your Mac saves screenshots means the system
shortcut feeds ArtFetcher too.
The action bar floating in the bottom-left of the gallery acts on the selected picture. Search My Library for Painting checks whether you already have it - see Your first search. The rest are for looking after the pictures themselves rather than the downloads: Preview shows the picture larger, Edit opens it in Preview so you can crop it before searching for it, Move files it away in a folder of your choosing, and Delete removes it.
The zoom controls in the top-right of the gallery size the thumbnails with their
− and + buttons, and the keyboard does the
same: - to shrink, + or = to grow, with or
without ⌘. What the gallery shows while it is empty is set in
Search and screen capture settings.
Now that you have collected pictures of paintings in your gallery, it is time to find high quality versions you can download and keep in your library.
First, select an image in the gallery and press Search My Library for Painting. This checks to see if you already have this painting. It performs a visual search using Apple Vision. See When you already own the painting for more details about this feature.
Next, use the fields in the search pane to search for a painting. Enter the Artist name and the Painting title, then press Search for Painting. The optional Painting year field is worth filling in when an artist painted the same subject more than once. The names and titles you enter are saved - they will be restored as you click between the gallery images.
We suggest you give the artist's full name, as a museum would list it - Pierre-Auguste Renoir rather than Renoir. Enter the title in its most common English form. If a search fails, try again with the title in the painter's language.
The Clear button empties the search fields and deletes any files downloaded by the last search.
The first row in the status pane is the status line. ArtFetcher displays status, progress and error messages in this row.
The second row in the status pane is the artist row. Before any collection is queried, ArtFetcher resolves the name you typed to a specific painter on Wikidata, so that a search for Bruegel asks the collections about the person rather than the word. The row shows the full name of the artist it finds, followed by the years of their birth and death in brackets. Then in square brackets is the unique number that identifies the artist in Wikidata. Next are two clickable icons, the first opens the artist's page in Wikidata and the second opens their Wikipedia page.
The remaining rows are called the provider rows. There is one for each provider and they report the current status of that provider's search: waiting, searching, downloading, or the answer it gave.
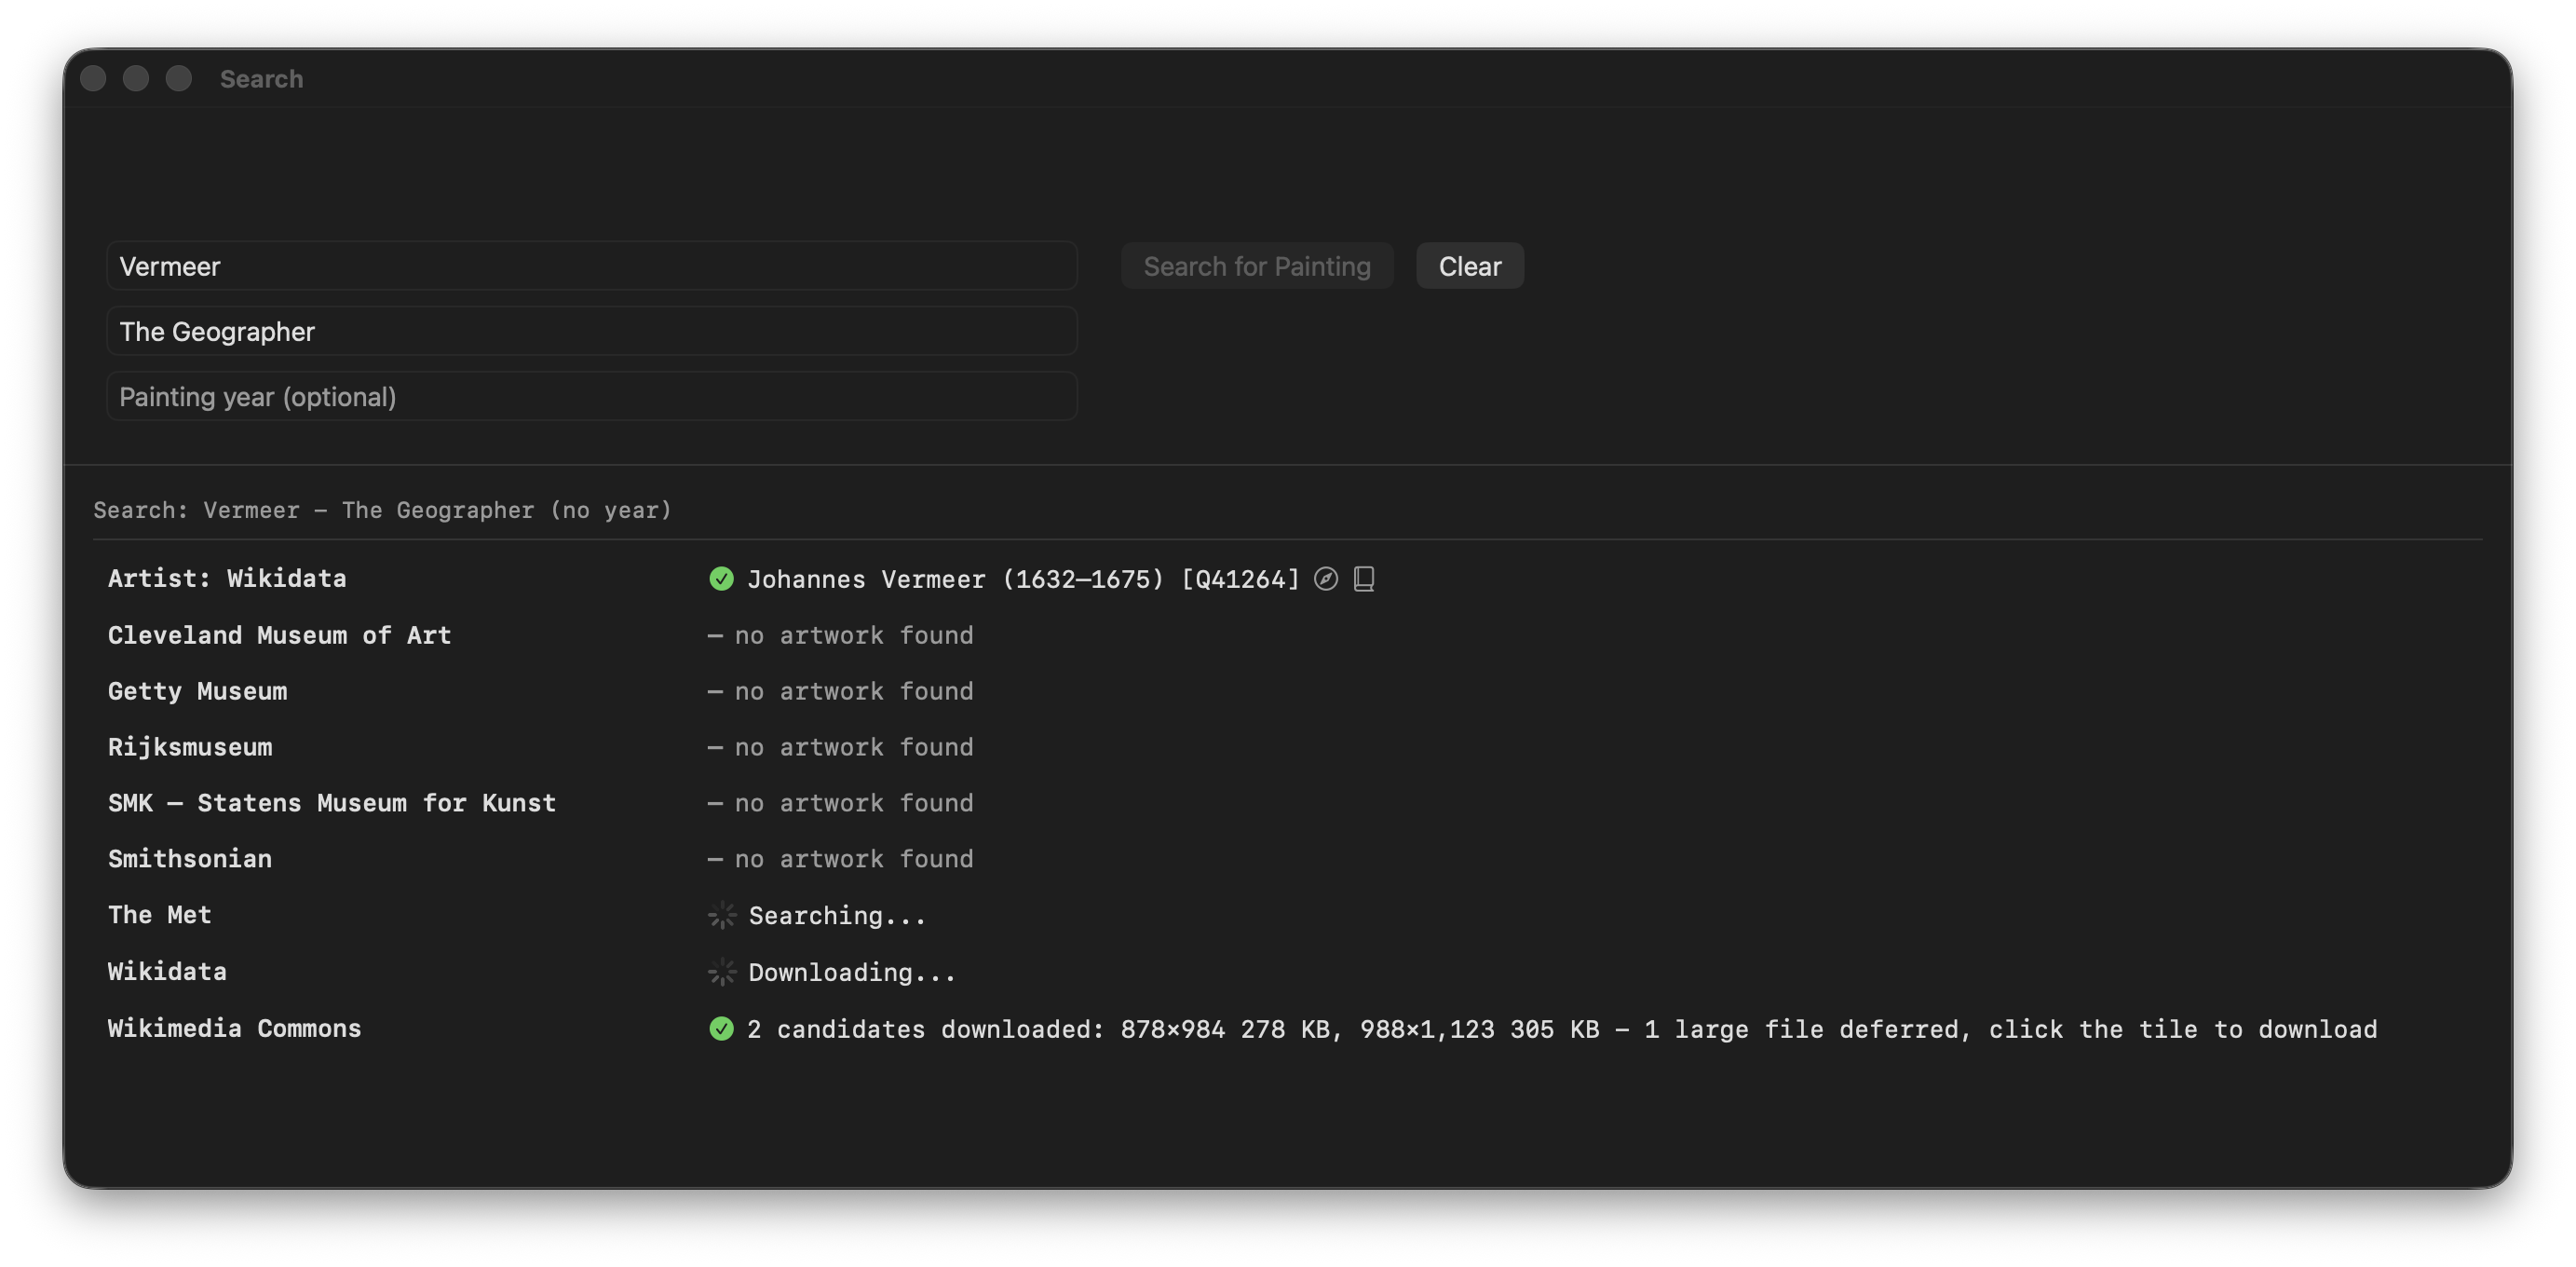
Click any row to read the detailed log for that provider. When a request to a provider fails, the corresponding row shows the reason why.
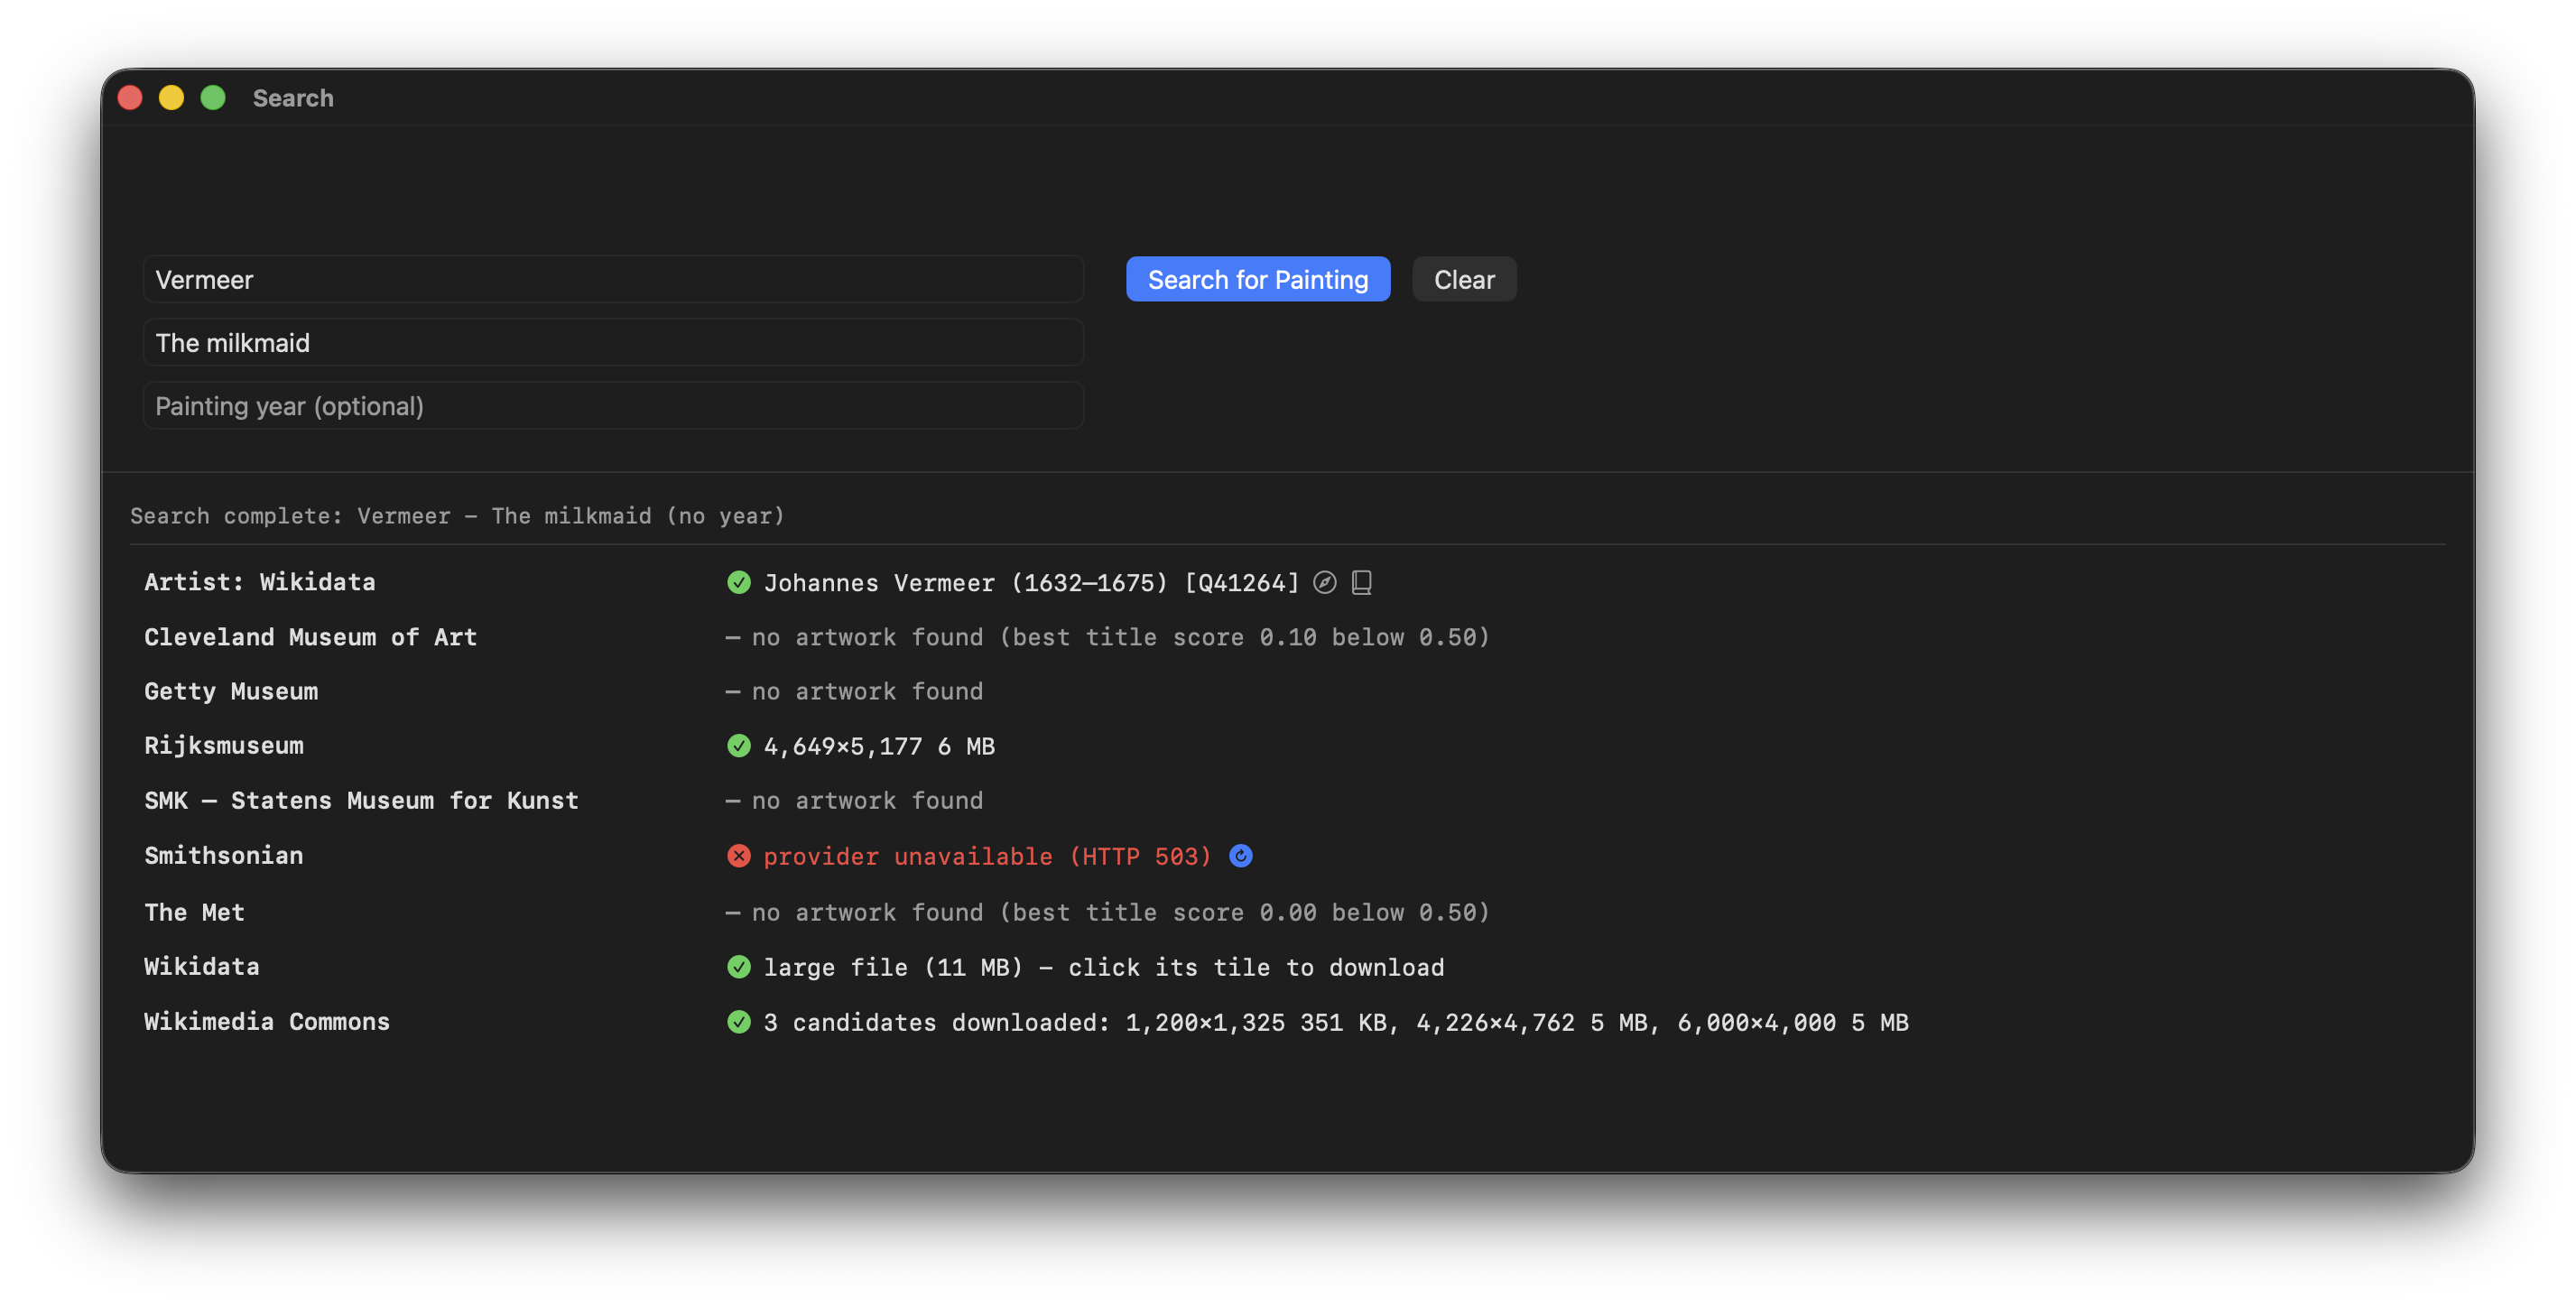
Provider responses, and what they mean:
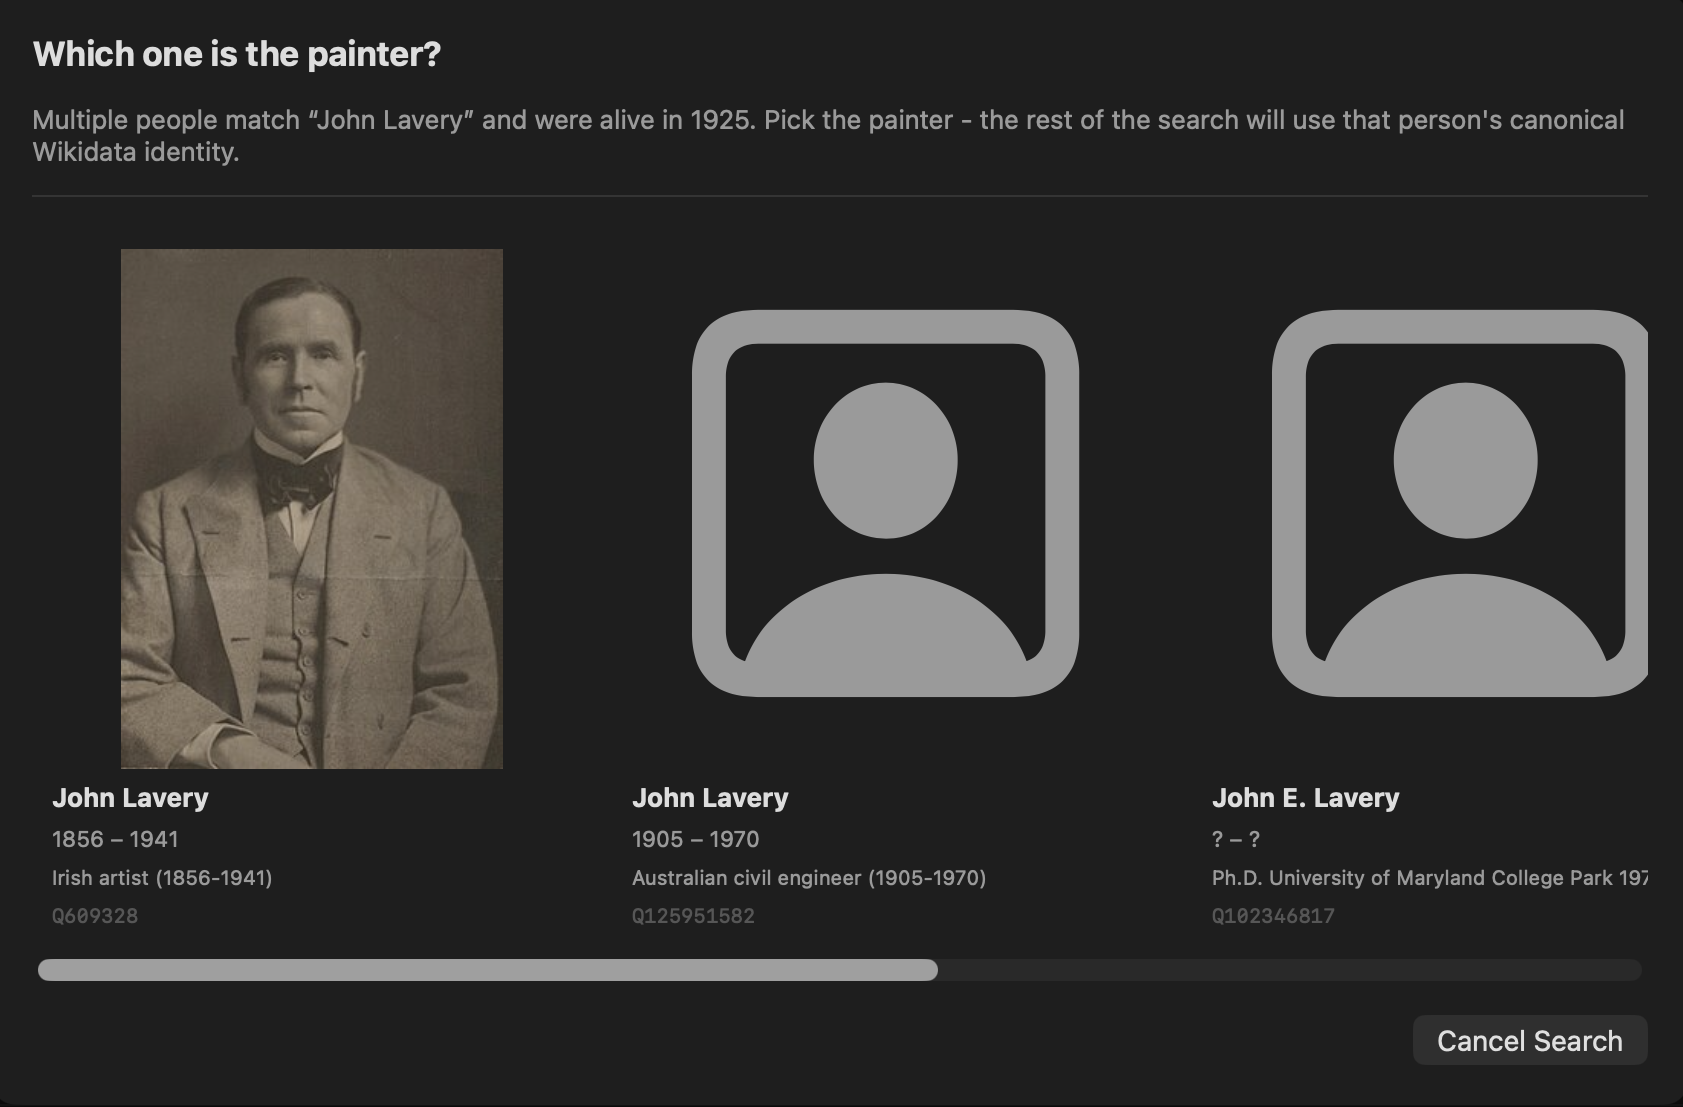
If the name you typed matches more than one person, ArtFetcher stops and asks you to identify the painter. If you provided a date for the painting ArtFetcher will try to automatically select the correct person based on their date of birth and death.
When you press Search My Library for Painting, ArtFetcher compares the selected gallery image with images in your library using Apple Vision. This visual check happens locally on your Mac.
A very close visual match opens the visual match card and shows you the matching image in your library. Choose Open Image to open the library copy or Show in Finder to reveal it.
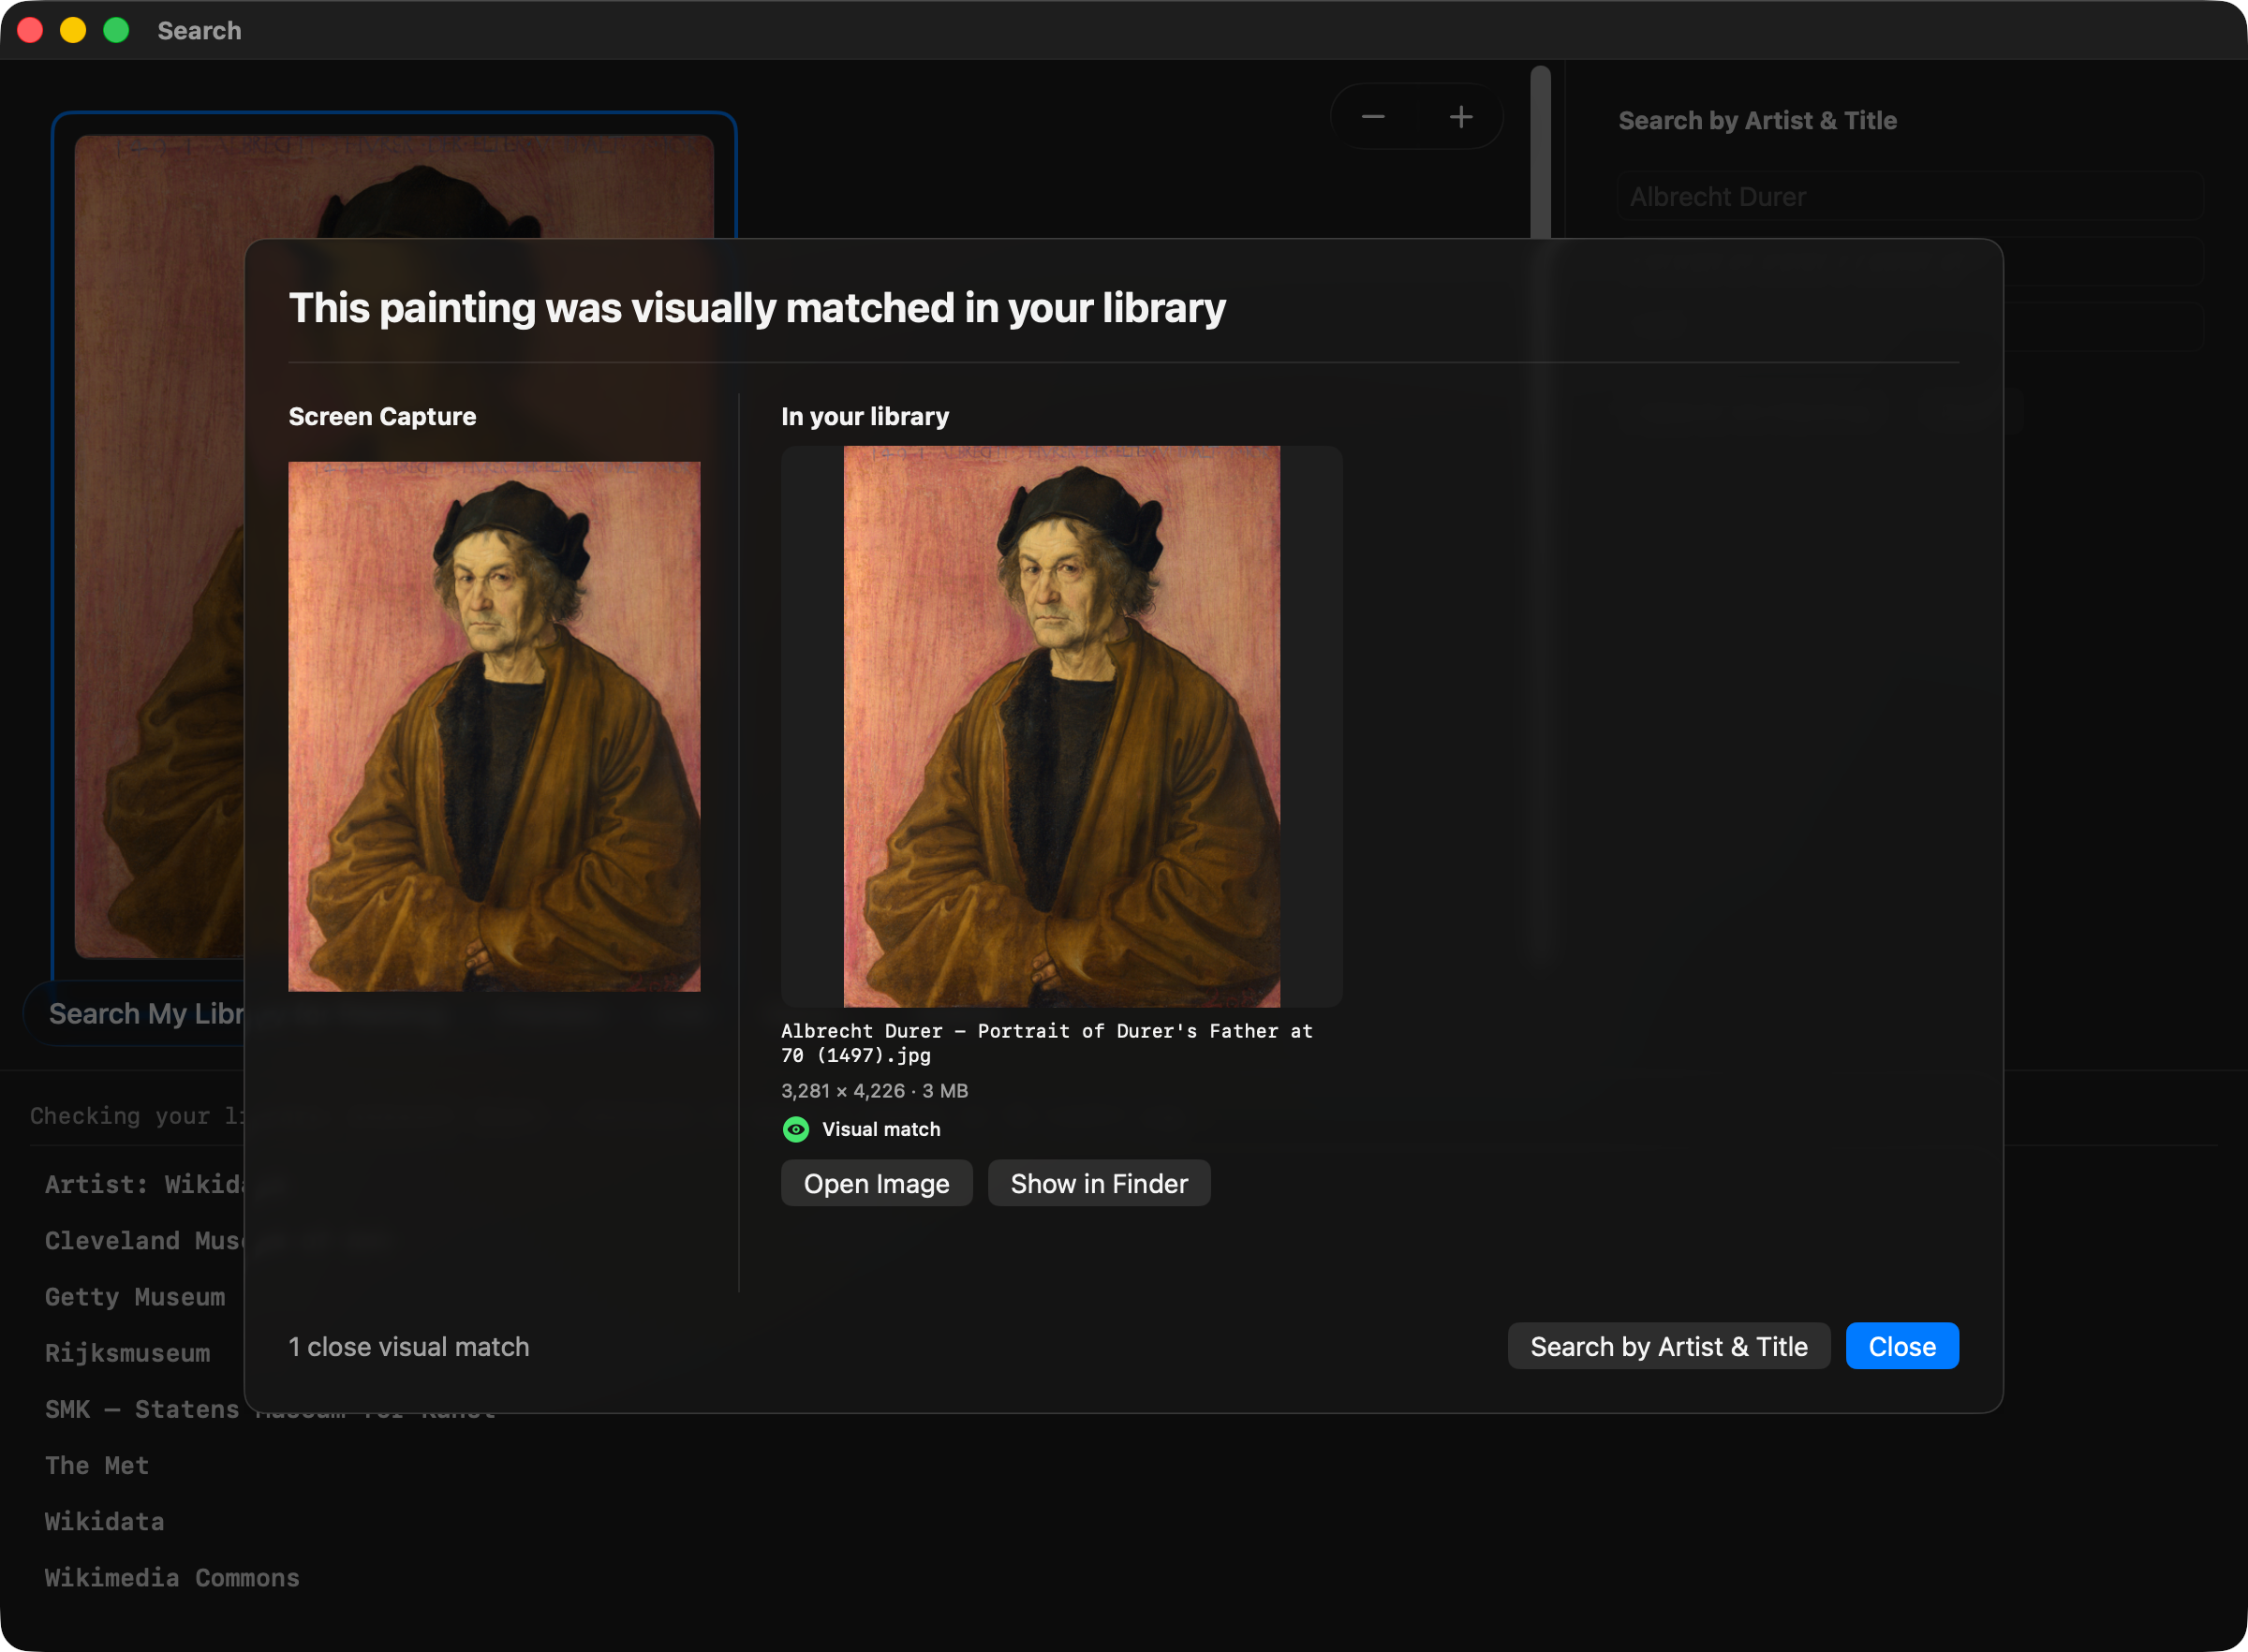
When ArtFetcher finds a visual match, it fills the Search fields with the artist
and title from the library filename. The year is filled only when the filename ends in a
four-digit year, such as Artist - Painting (1805).jpg.
To search the providers' collections anyway, choose Search by Artist & Title. The card closes and the providers are searched for the artist and title in the Search fields. When more than one library image matches, choose the one to search by from the Select library image to use for search menu.
This visual check is deliberately conservative. If no close match is found, a message is displayed in the status line and the Search fields are cleared, ready for you to enter them manually.
Whenever ArtFetcher is about to search the providers - after you press Search for Painting - it also looks through your library for a file with the same artist and a similar title. If it finds one, it stops and lets you know. A confident match is announced as matching a name in your library; a weaker one as a possible match. Each library image says how much of its name matched: the artist and the whole title, or the artist and part of the title. Clicking Search Online goes ahead anyway - worth doing if you want a better version than what you have.
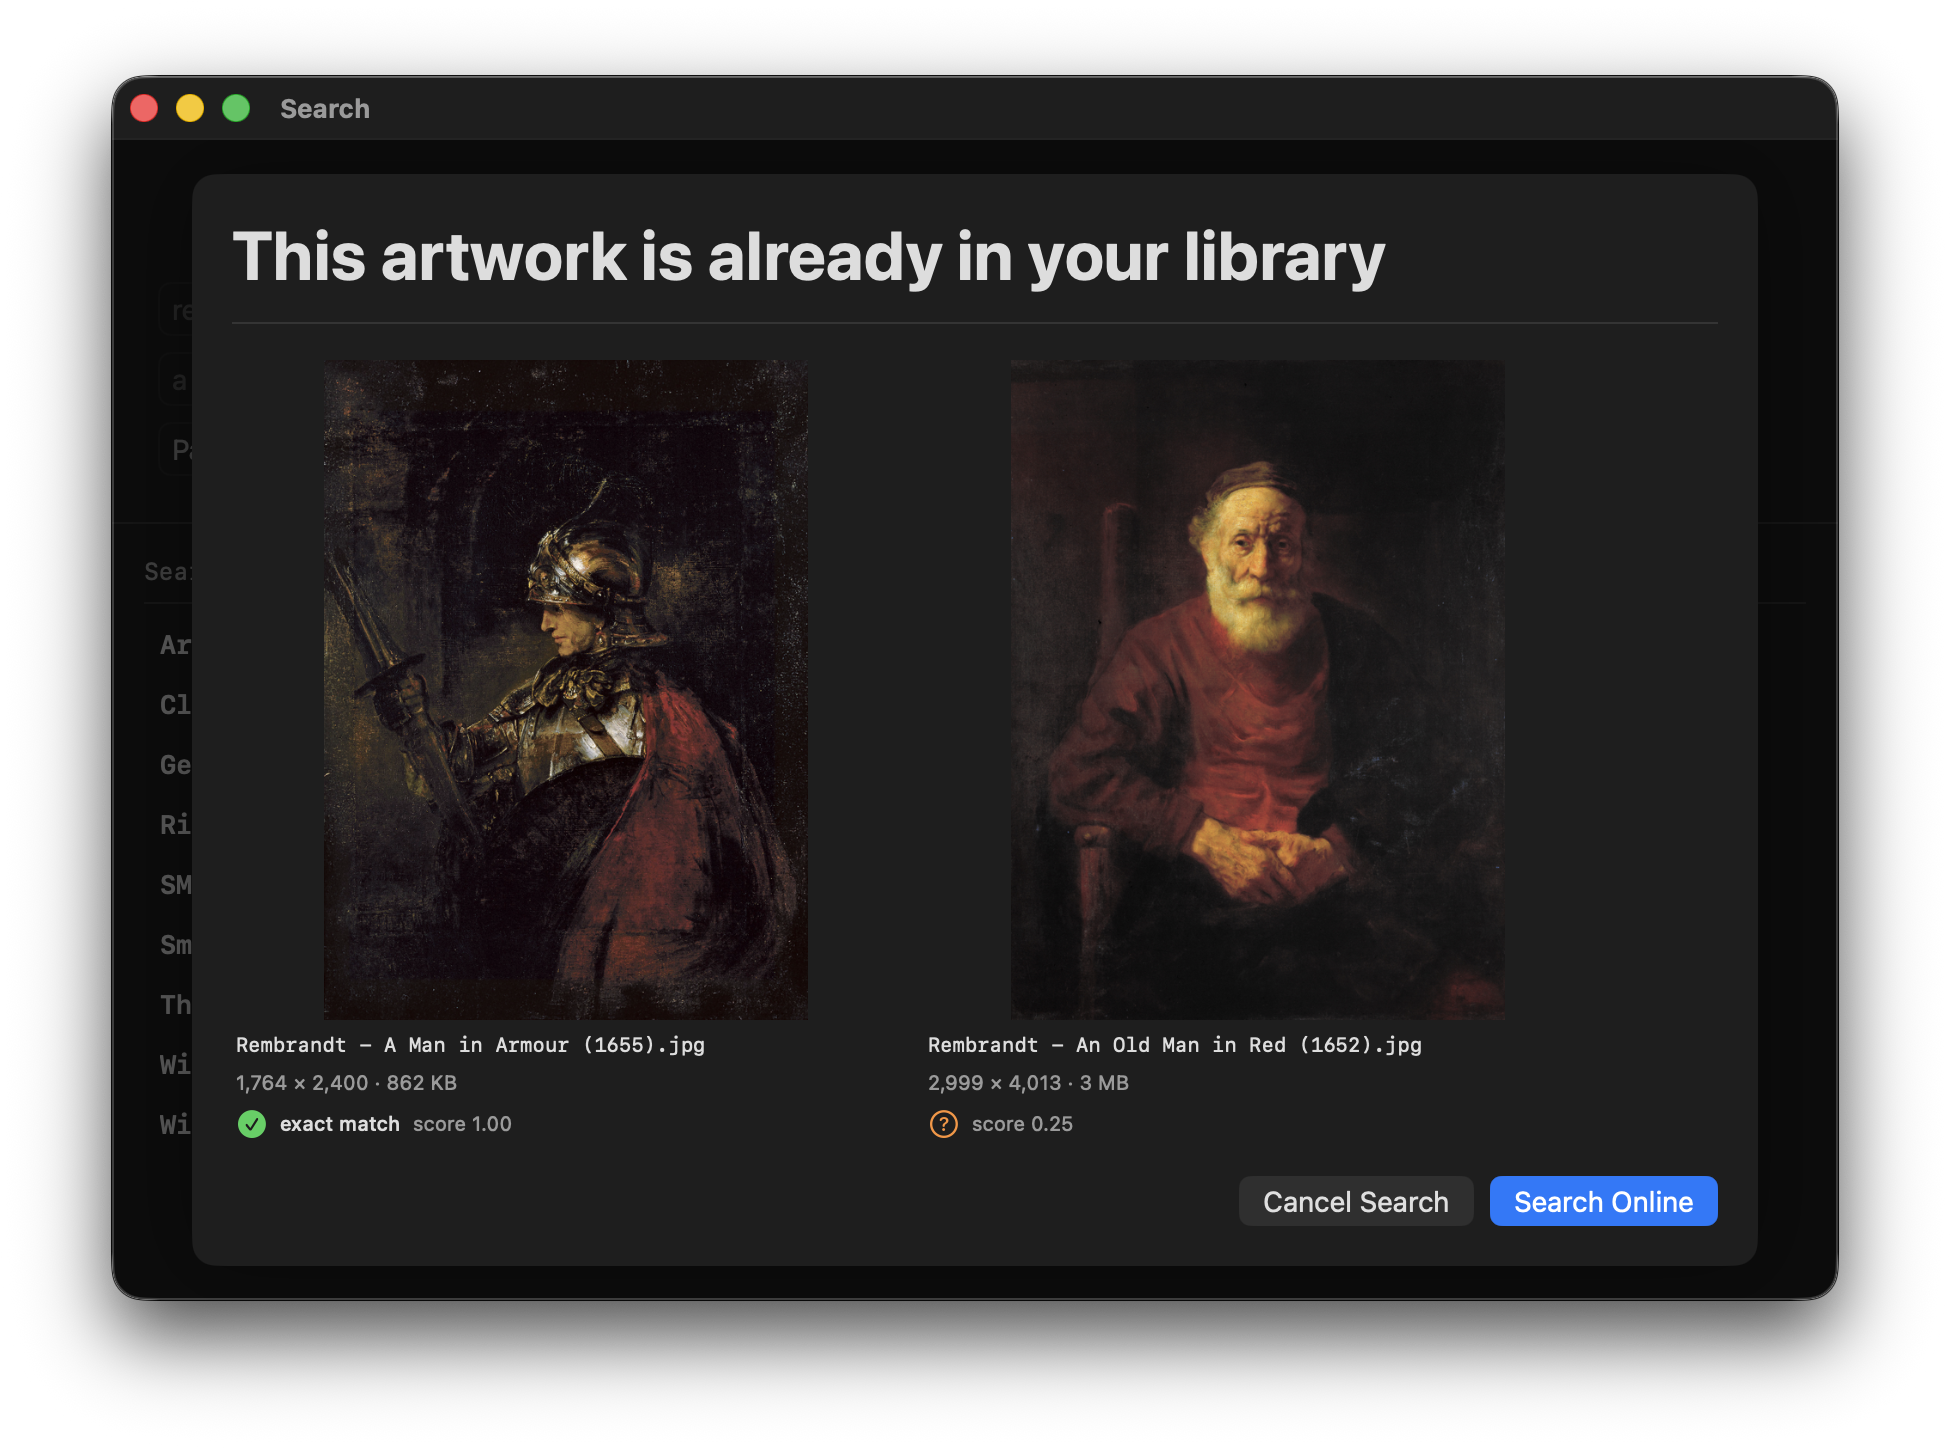
Library images you have just seen are not asked about again: the matches the visual match card showed before you chose Search by Artist & Title, and a library painting you dragged onto the gallery, whose filename filled the Search fields.
Thumbnails of every downloaded image are displayed in the Search Results window (Window → Search Results, ⌘2).
The top section of the Search Results window is called the gallery. Below the gallery is the action bar. And under that, the lower section of the window is called the info panel.
Most collections have a single scan of a painting, which is what ArtFetcher will download. Wikimedia Commons however often has several scans of one painting, so ArtFetcher downloads up to three of the largest ones and lets you choose which one to keep.
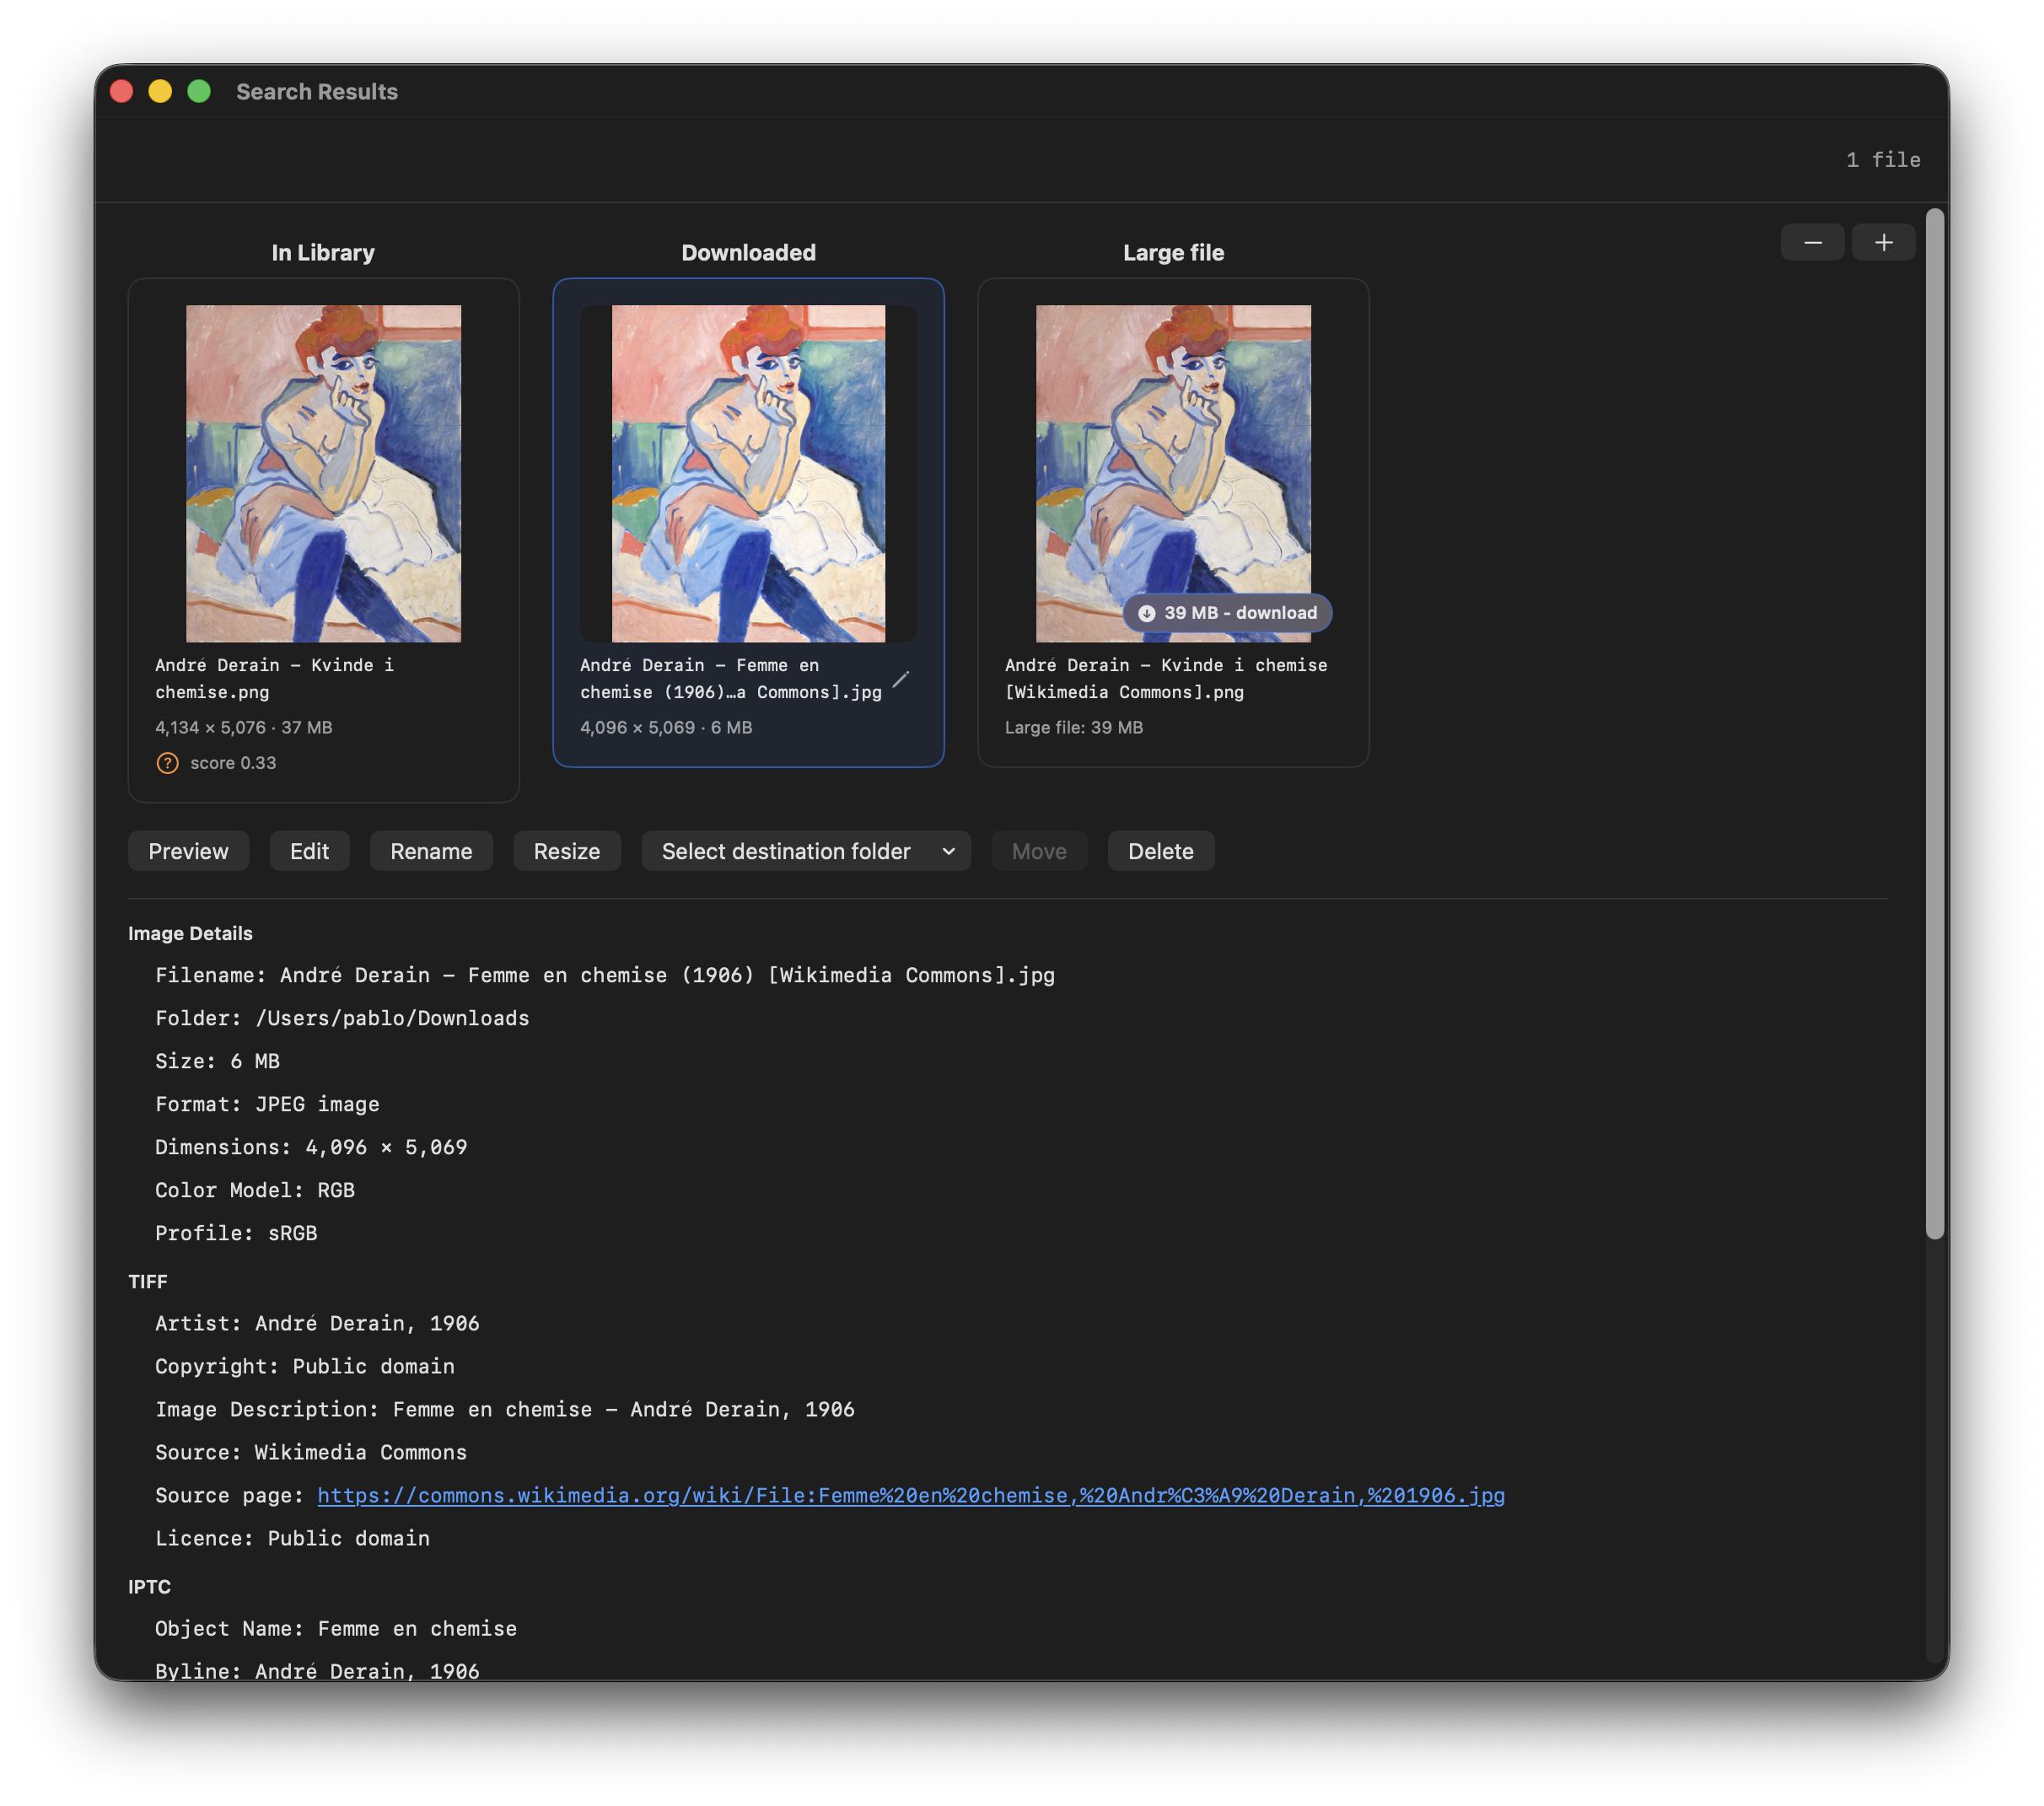
Any matches already in your library are marked In Library, whether the visual check or the artist and title found them. Those the visual check found come first and say visual match. Images that were downloaded to your computer are marked Downloaded. Images that are too big to automatically download are marked Large file and have a preview thumbnail so you can see if the painting is what you want. If it is, click the download badge.
When you click on a tile, the buttons in the action bar become active. These buttons are:
⌘delete).
Deleting a downloaded file is undoable from Edit → Undo; deleting
a painting that was already in your library is confirmed first.In the top right of the gallery are the zoom controls.
The − and + buttons resize
the gallery tiles, not the downloaded images. There are keyboard shortcuts: - to shrink,
+ or = to expand, with or without ⌘. Each window
remembers its own zoom.
Below the action bar, in the info panel, the selected tile's own details are listed: pixel dimensions, file size, format, and then every block of metadata the file carries - the licence, the collection it came from, and the URL for that painting. URLs are clickable links.
Downloads are temporary. They go to the folder you chose during setup, shown in Settings → Downloads, and stay there until you move them into your library or delete them.
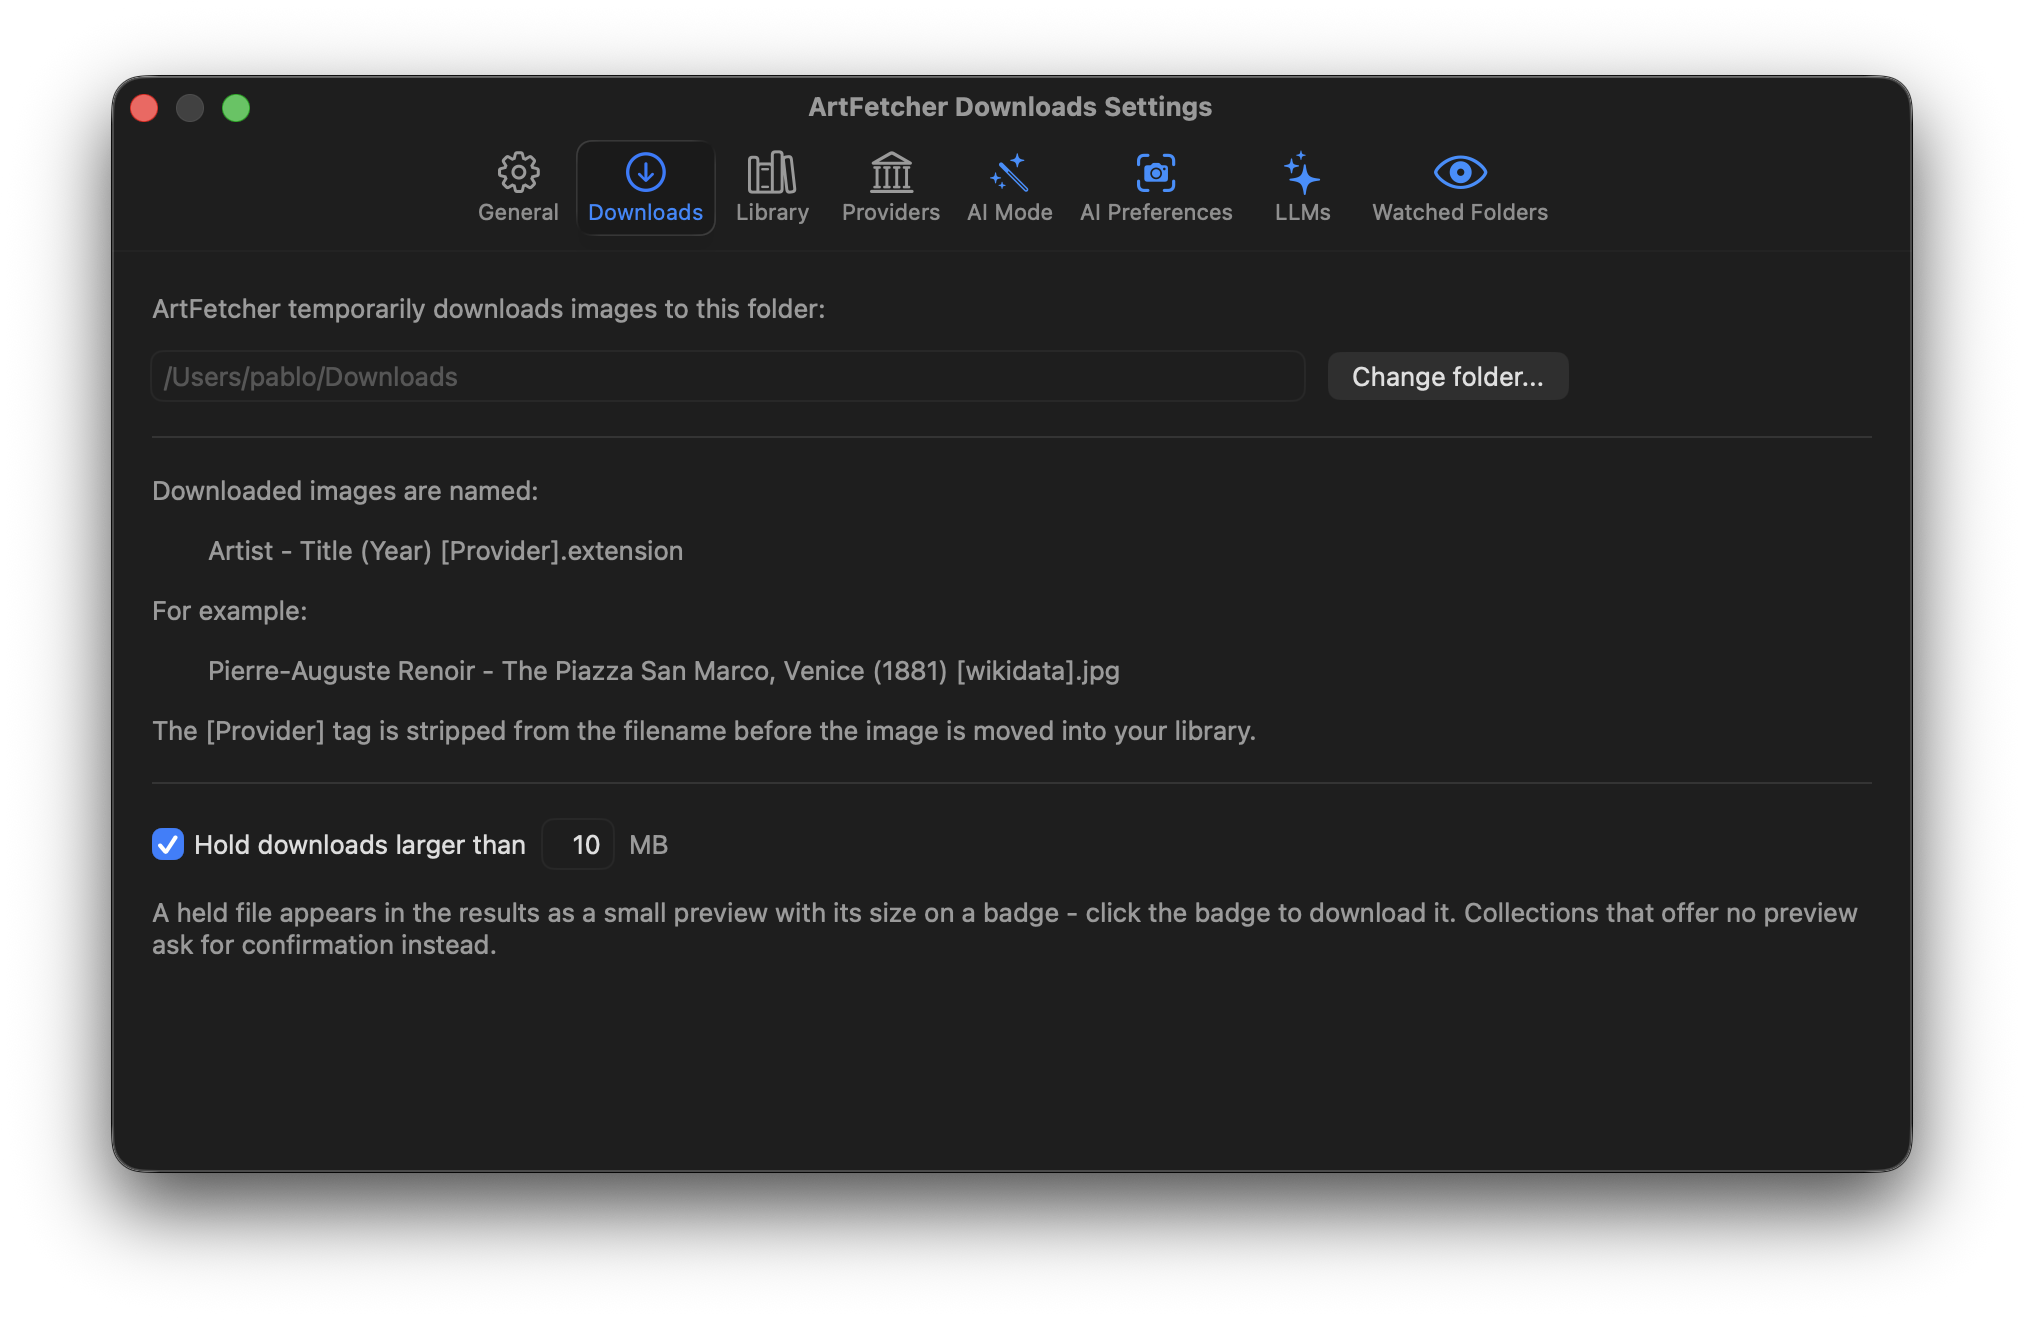
Each dowloaded file is named Artist - Title (Year) [Provider].extension.
For example:
Pierre-Auguste Renoir - The Piazza San Marco, Venice (1881) [wikidata].jpg
Adriaen van Ostade - The Fiddler [Wikimedia Commons] (1673).jpg
ArtFetcher temporarily adds the [Provider] tag so
several collections' versions of one painting can sit side by side without colliding.
The tag is deleted when the file is moved to your library.
Museum scans can be very large. Hold downloads larger than keeps anything over the size you set from downloading automatically: the search continues, and the file appears in the results as a small preview with its size on a badge - click the badge if you want the full image.
Ignore files smaller than works in kilobytes. It rejects images smaller than that size.
Ignore images smaller than works in pixels. Choose your own display, one of the listed display standards, or Custom for a size of your own. Anything smaller is rejected - the provider row says what the image measured and what your minimum is. ArtFetcher uses this one setting for landscape, portrait and square paintings. The size you choose is turned to match the painting's own shape, so a 1920x1080 minimum asks the same of a portrait canvas at 1080x1920. A square painting is judged on the shorter edge of your choice.
Tell ArtFetcher where you already keep art in Settings → Library.
ArtFetcher uses Apple Vision to build a searchable index of your library. The status of this indexing process appears at the foot of the tab. Indexing runs in the background and is saved between launches. Folder changes update the index; Rebuild Visual Index runs the whole process from scratch. Searches continue normally while indexing is in progress.
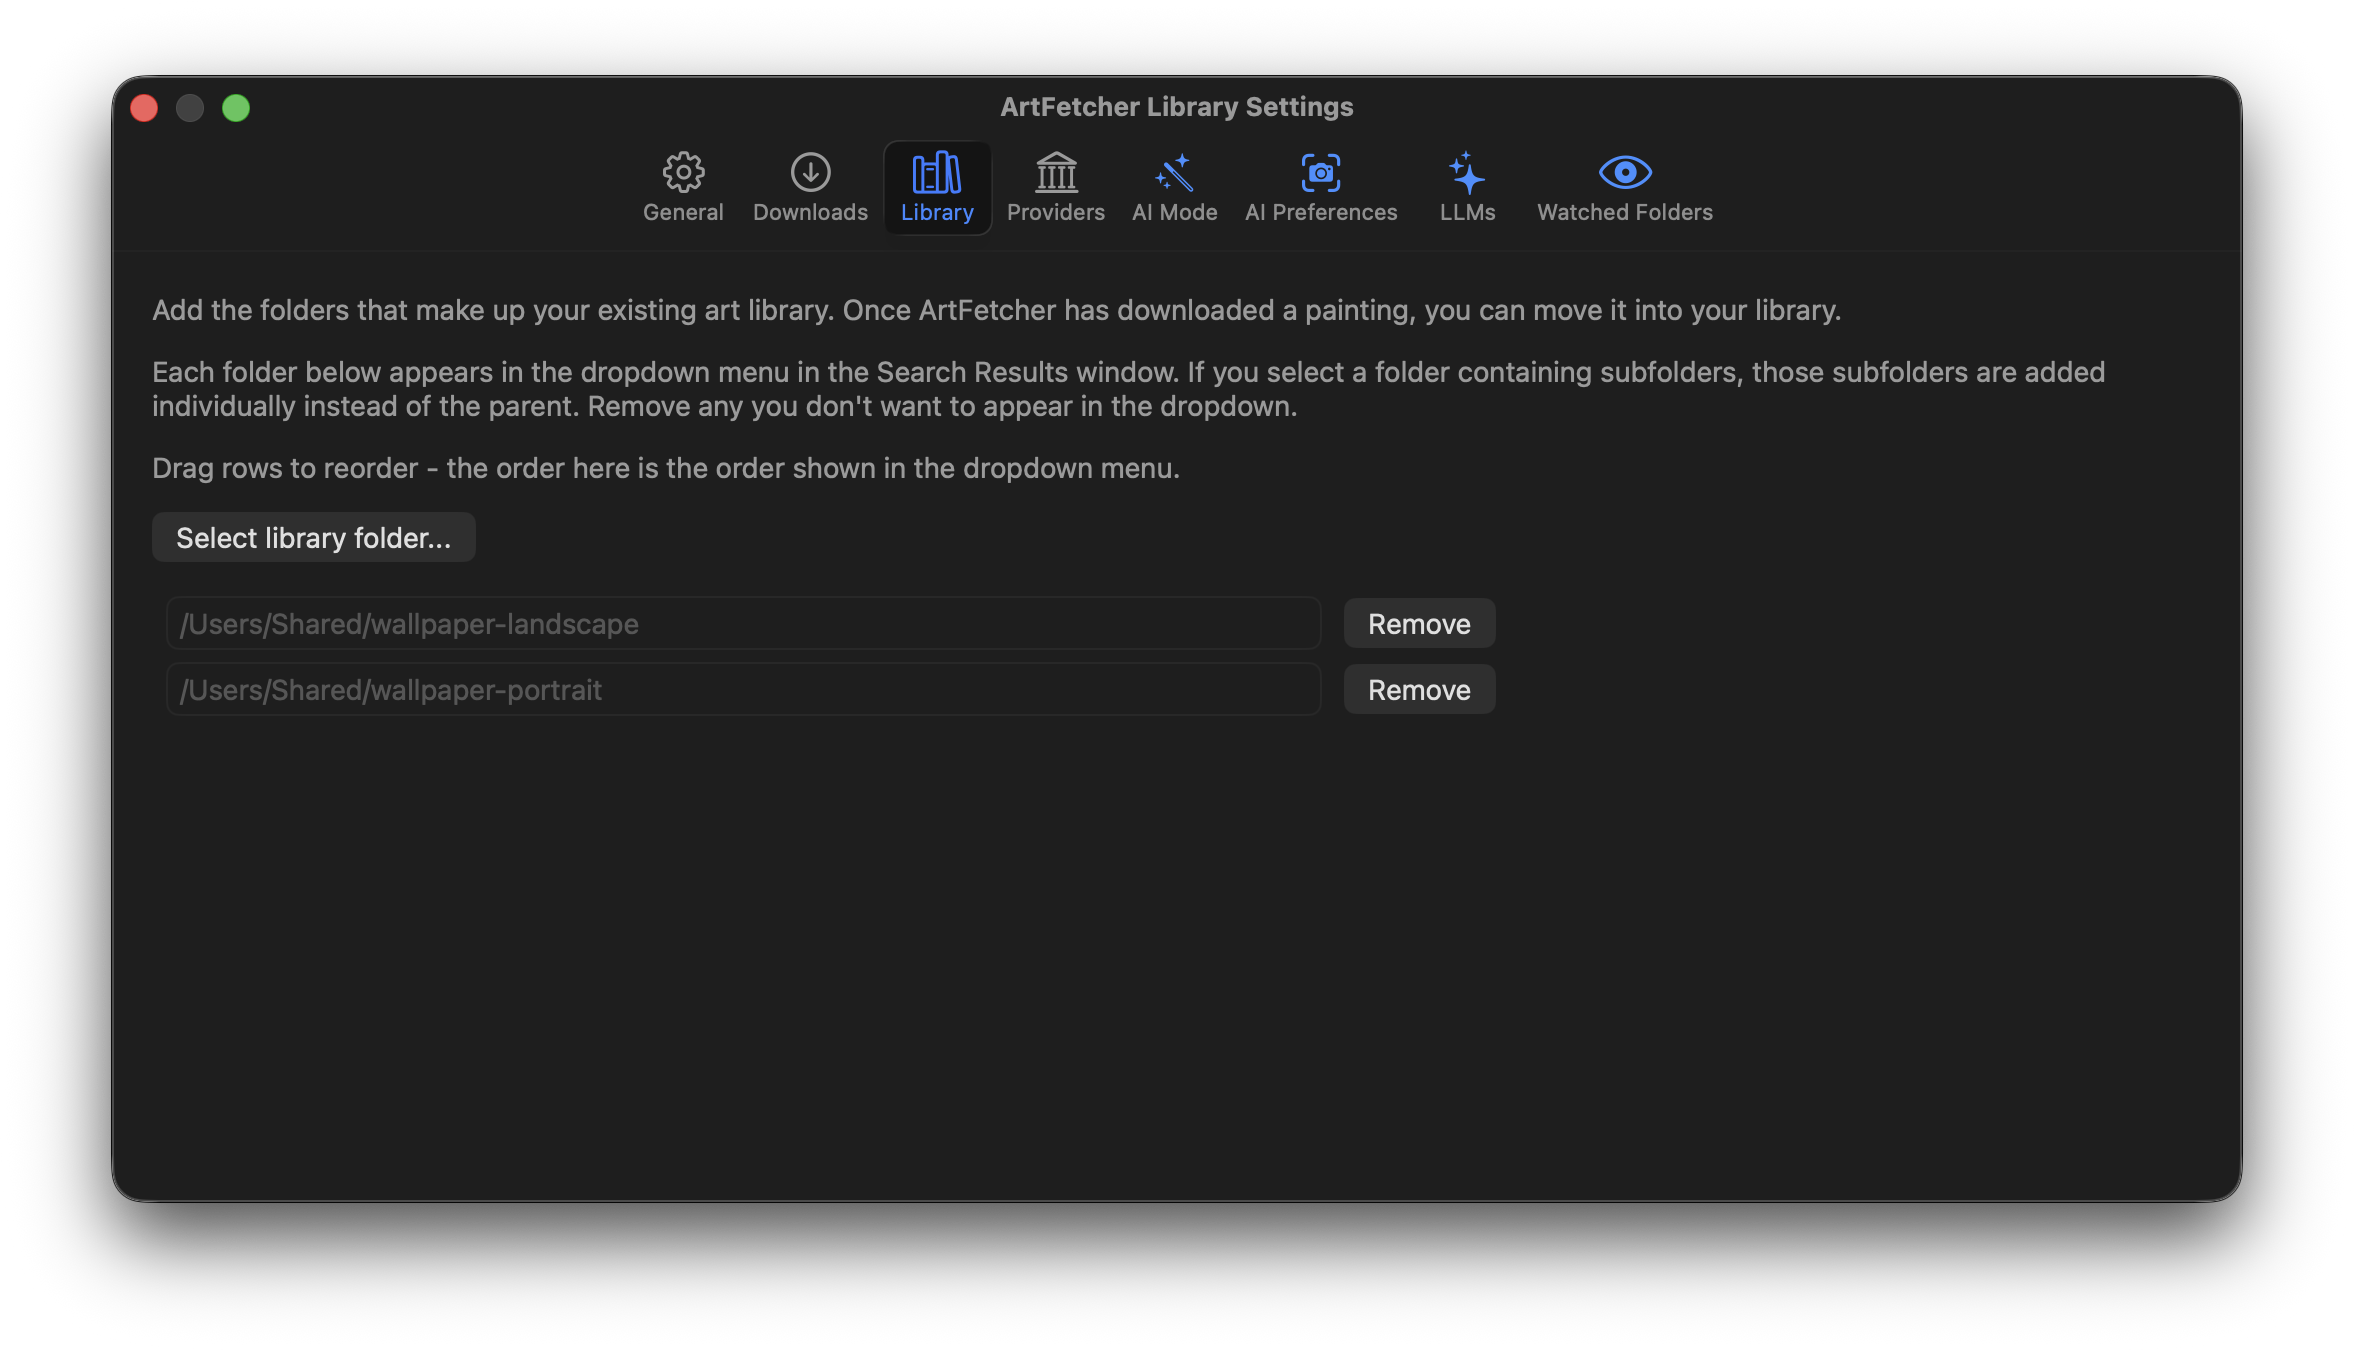
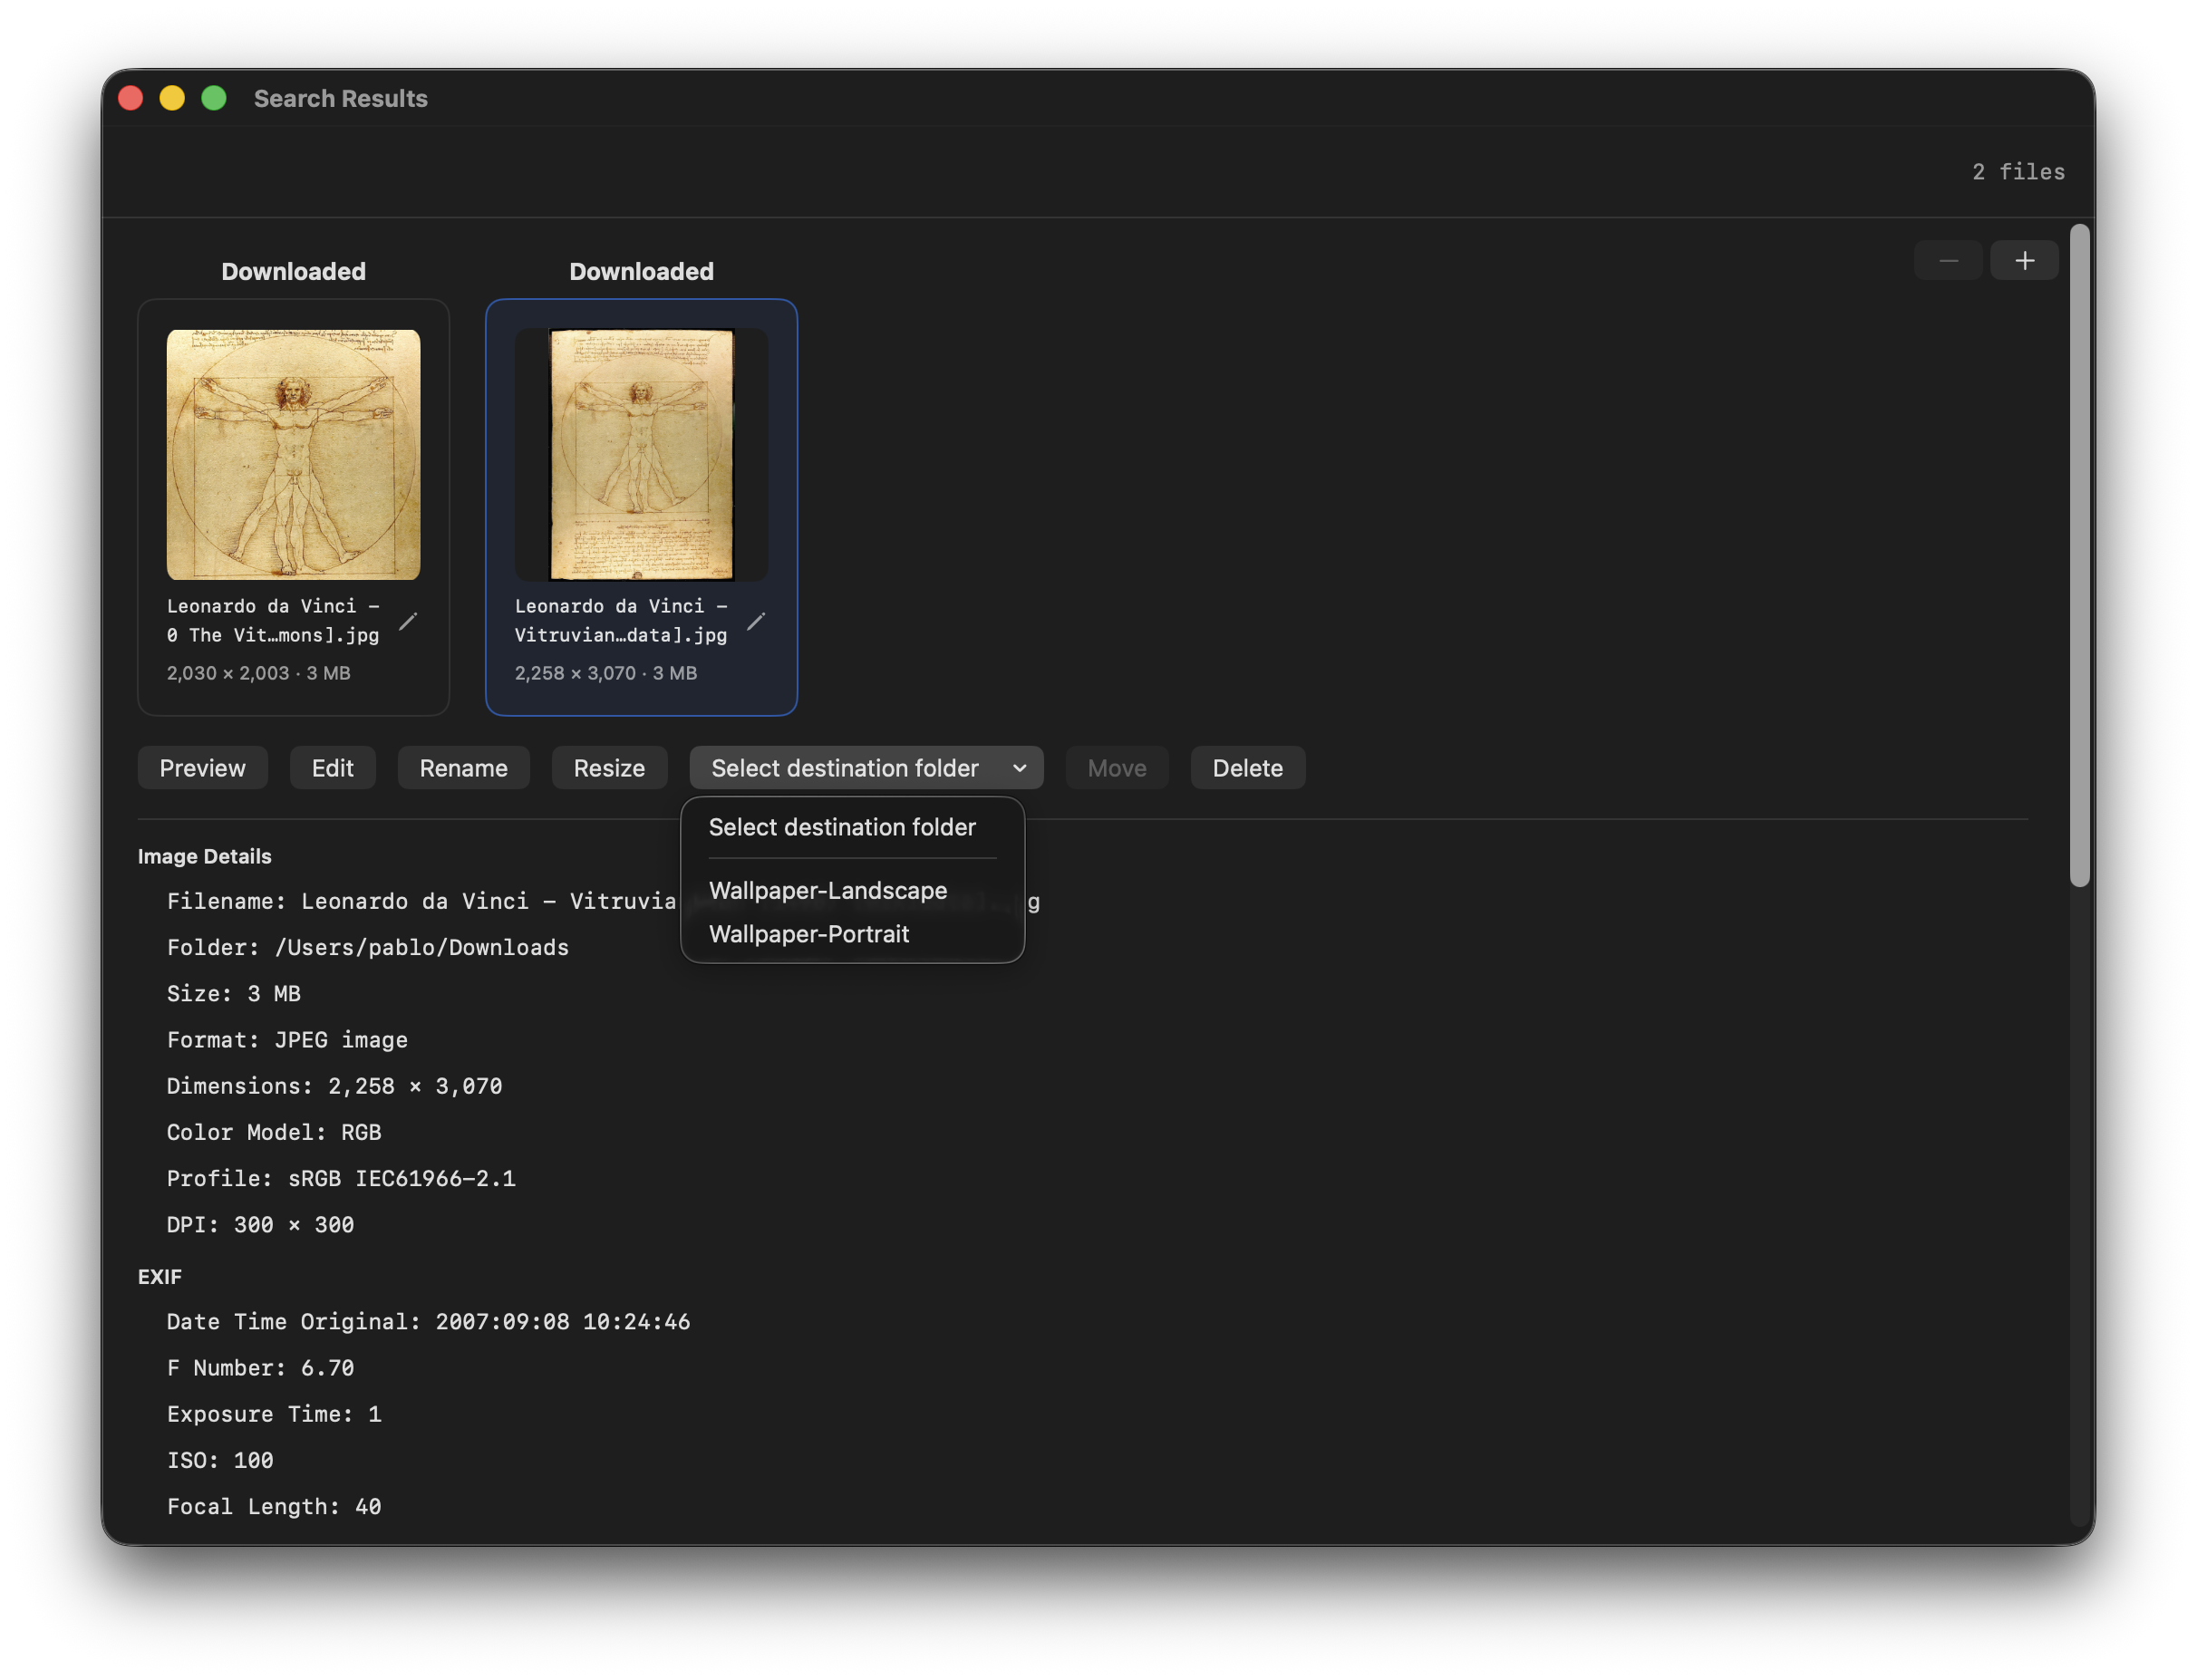
These folders are listed in the Search Results window's move menu.
Choose one folder at a time, or choose a parent folder to add all subfolders in one go. To take out a subfolder you don't want listed, click the gear button on its row and choose Remove. The order of folders in this list is reflected in that menu - drag the rows to put your usual destination at the top.
Removing a folder from your library just removes it from this list: your files are left untouched.
ArtFetcher is more than happy with a single folder for all your artwork. However, if you use these images as wallpaper for your displays, having separate folders makes it easier to pick and choose what painting to display and where. You can use the paintings in your library as the wallpaper for your Mac. See System Settings → Wallpaper.
For example, if you have a laptop and an external display rotated 90 degrees, you may choose landscape artwork for your laptop and portraits for your display.
Alternatively, you may have separate folders for period or style, so Dutch interiors don't sit among the Impressionists; or by artist, when you collect a few painters deeply. Whatever you choose, the folder names are what the move menu shows.
Once landscape and portrait paintings live in folders of their own, ArtFetcher can choose between them for you. Click the gear button on a folder's row in Settings → Library to open Folder Settings, then pick one of the four orientations: landscape, portrait, square or any. The one you pick appears as a glyph on the row, and clicking that glyph opens Folder Settings again. A folder you never set behaves exactly as it does today.
When you open the settings for a folder, ArtFetcher scans that folder and says what's in there - e.g. 123 landscape and 2 portrait paintings found - so you can see what a folder has actually contains before deciding what it's for.
A painting counts as square when its two sides are within Square tolerance band of each other. You can change this tolerance amount - it is below the folder list in Settings → Library. Five percent is the default amount.
Select a downloaded painting in the Search Results window and the move menu comes up already set to the first folder with an orientation that matches. A landscape painting finds a landscape folder, falling back to one set to any; a square painting looks for a square folder first, then a landscape one, then a portrait one.
You can always pick a different folder. If the one you pick disagrees with the painting, a line under the buttons says so and leaves the choice to you.
Settings → Providers lists every provider's collection, what it holds, and the licence terms it publishes under. A green tick means it is switched on and will be queried.
We are always looking for collections to add. To qualify, a museum or gallery needs a public API that ArtFetcher can use to search for paintings, and that API has to say what licence each work is published under. Plenty of galleries and museums are online; few meet both conditions.
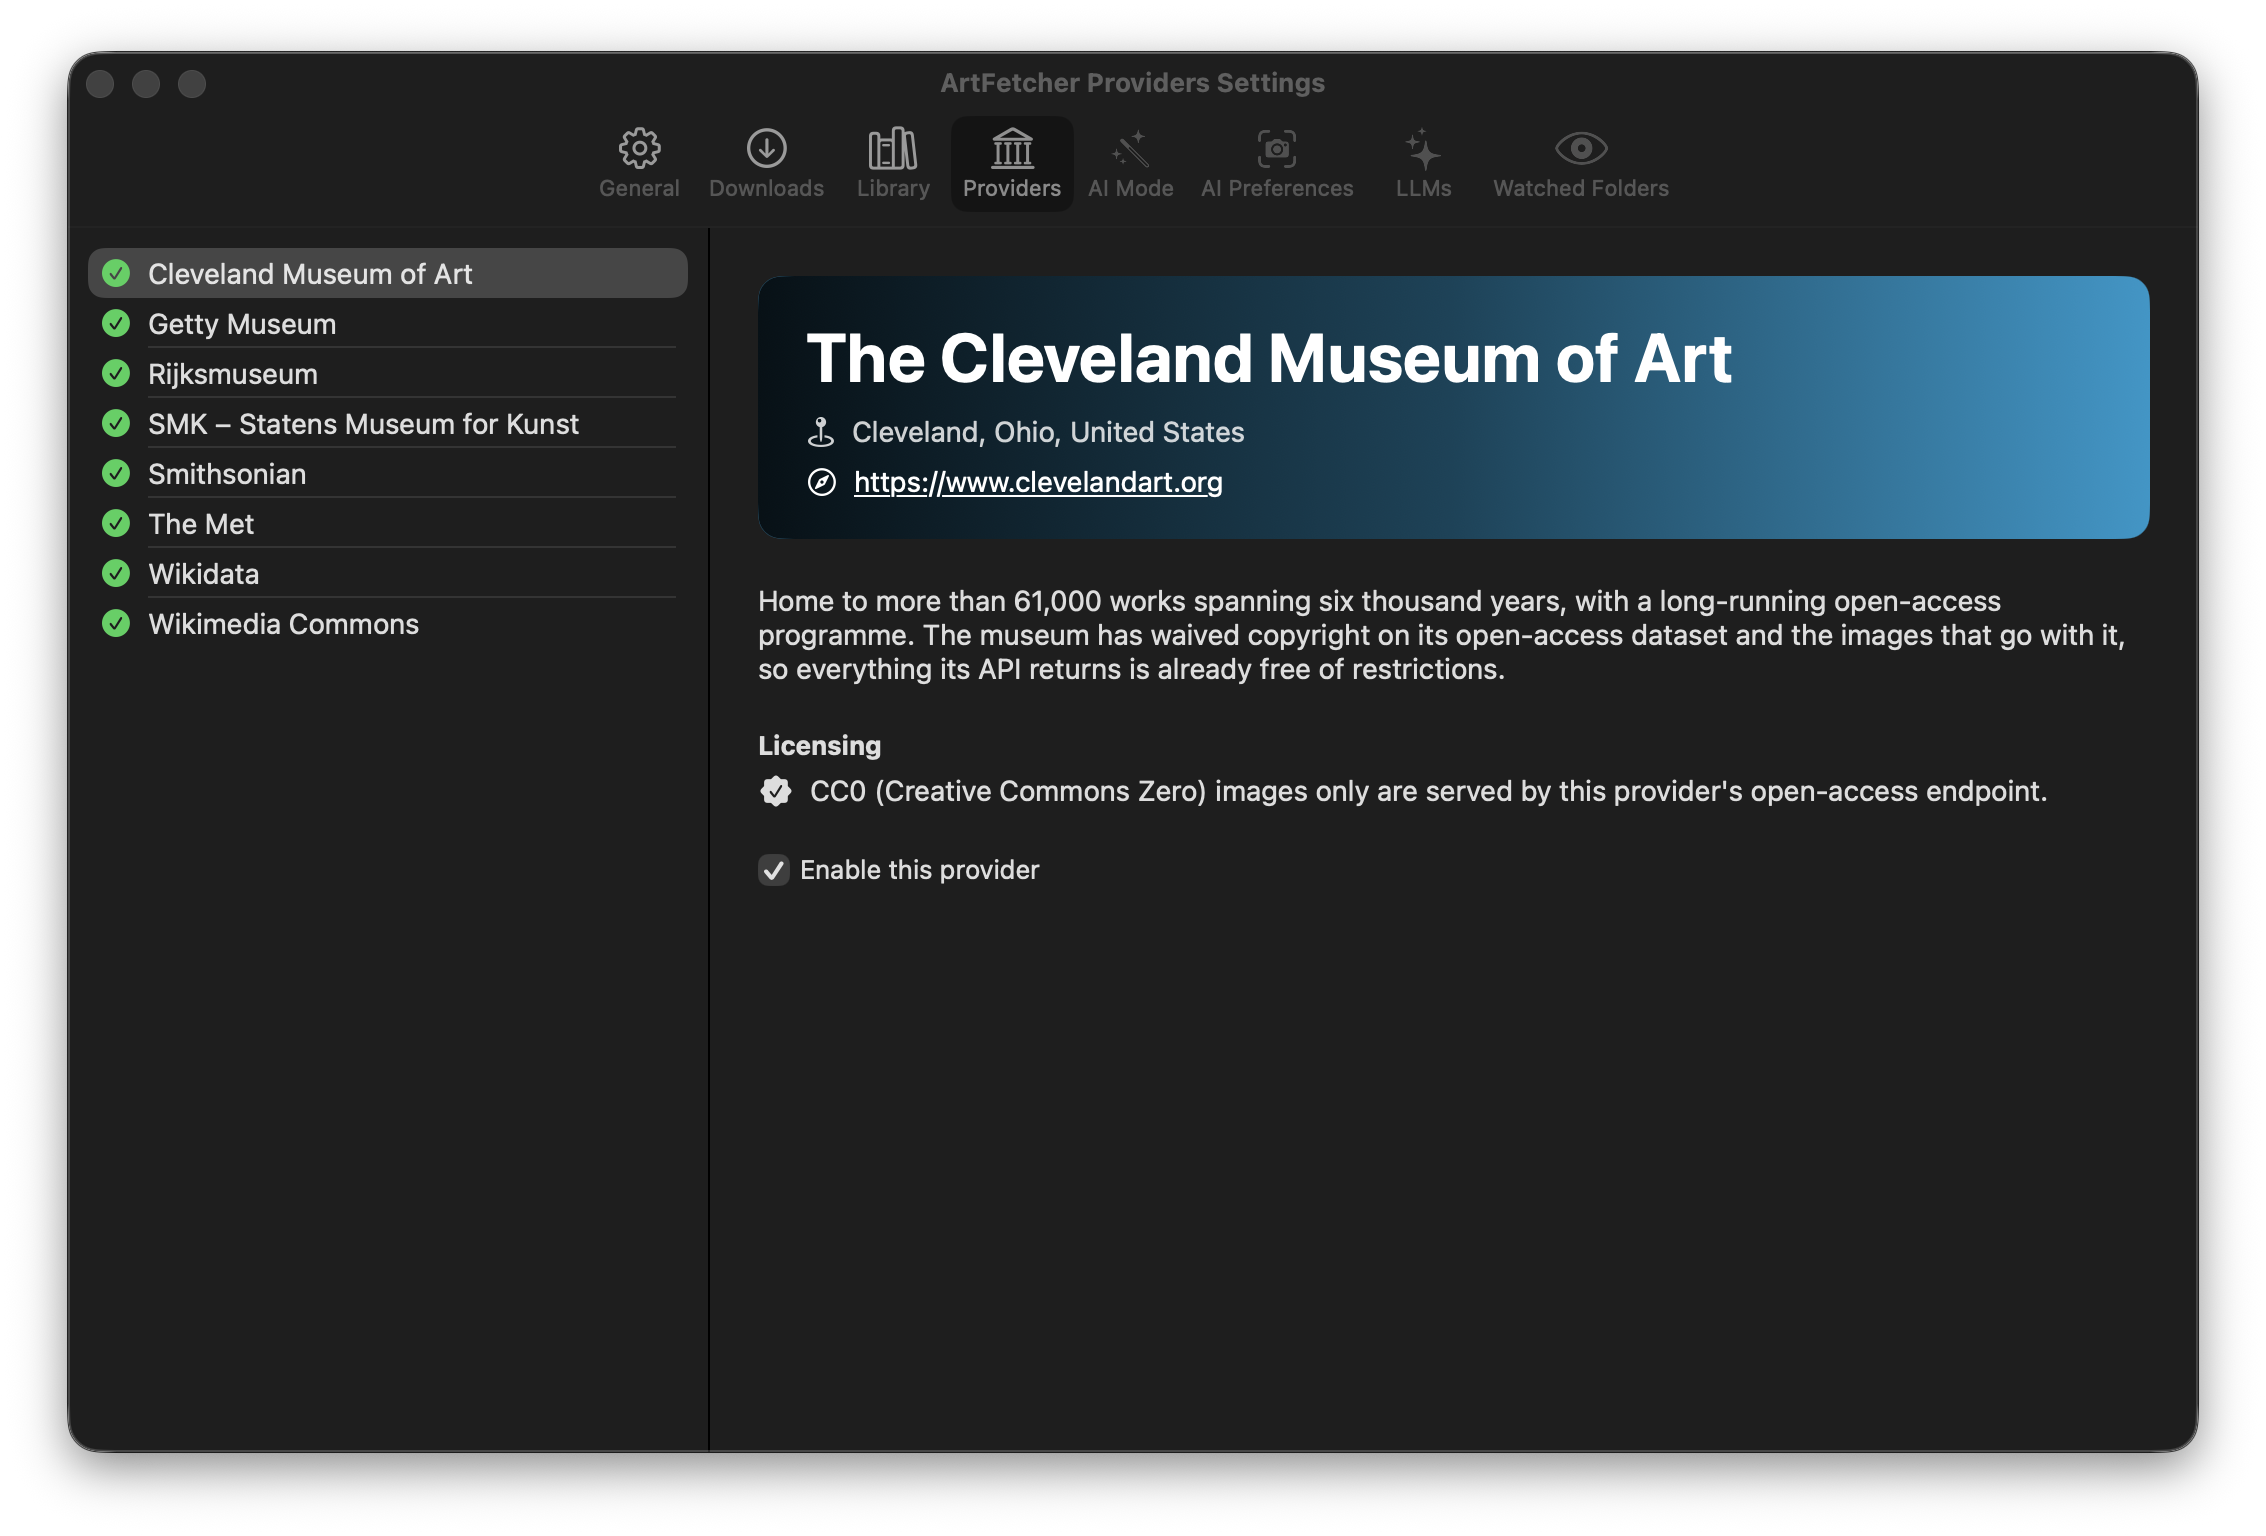
Most of these providers are ready the moment you install ArtFetcher. The Smithsonian is one you add yourself, and it is worth adding: its Open Access collection runs to millions of works, and the API that serves them asks for a free key of your own. Its page in this tab links to the form that issues the key. Paste the key into API key and press Test; once the Smithsonian accepts it, the collection joins your searches and takes its place among the provider rows.
You can also switch a collection off deliberately - with Enable this provider - if it is slow, or if you simply don't want its results. A collection switched off here is removed from the status pane.
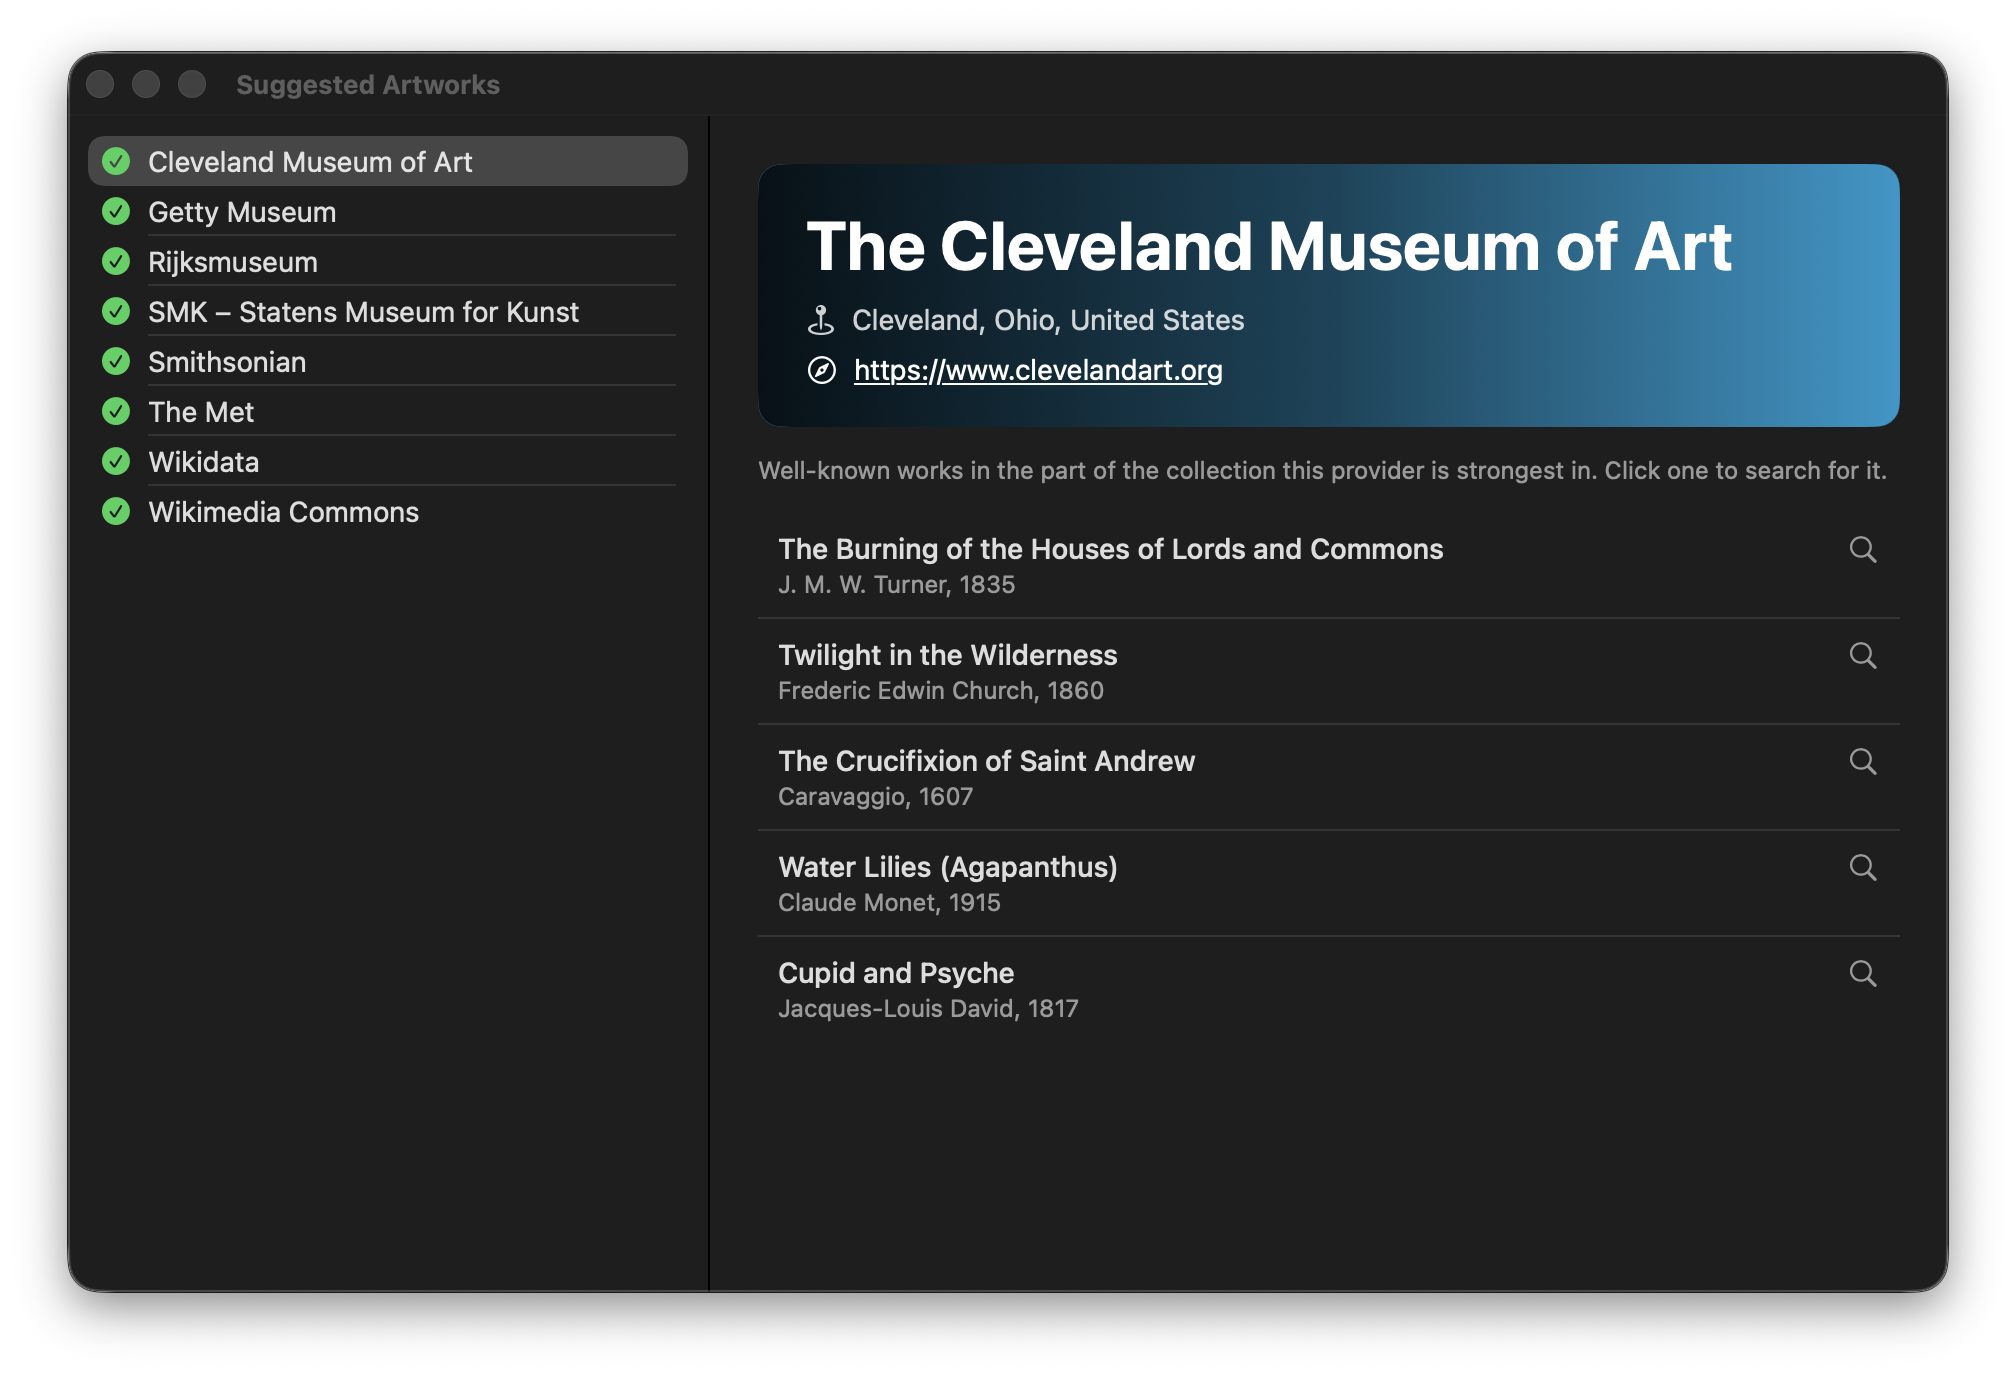
View → Suggested Artworks is a good place to start when you don't have a particular painting in mind, or if you are just starting your library. We have collected a handful of works from each of the providers; clicking one fills in the Search window's fields and starts a search.
Every file ArtFetcher saves is public domain or CC0 (Creative Commons Zero). It will not download an image whose licence it has not checked. Most collections are asked for public-domain or CC0 records; Wikimedia Commons and Wikidata report a licence per file, and each one is read before the download starts. Anything carrying an obligation - CC BY, CC BY-SA - is rejected. Anything whose licence can't be read is also rejected.
When a collection holds the painting but its licence asks for something in return, the provider row says so: Match found; not downloaded, followed by the licence that was found and the ones ArtFetcher accepts. View candidate opens the file's page at the collection so you can read the terms yourself.
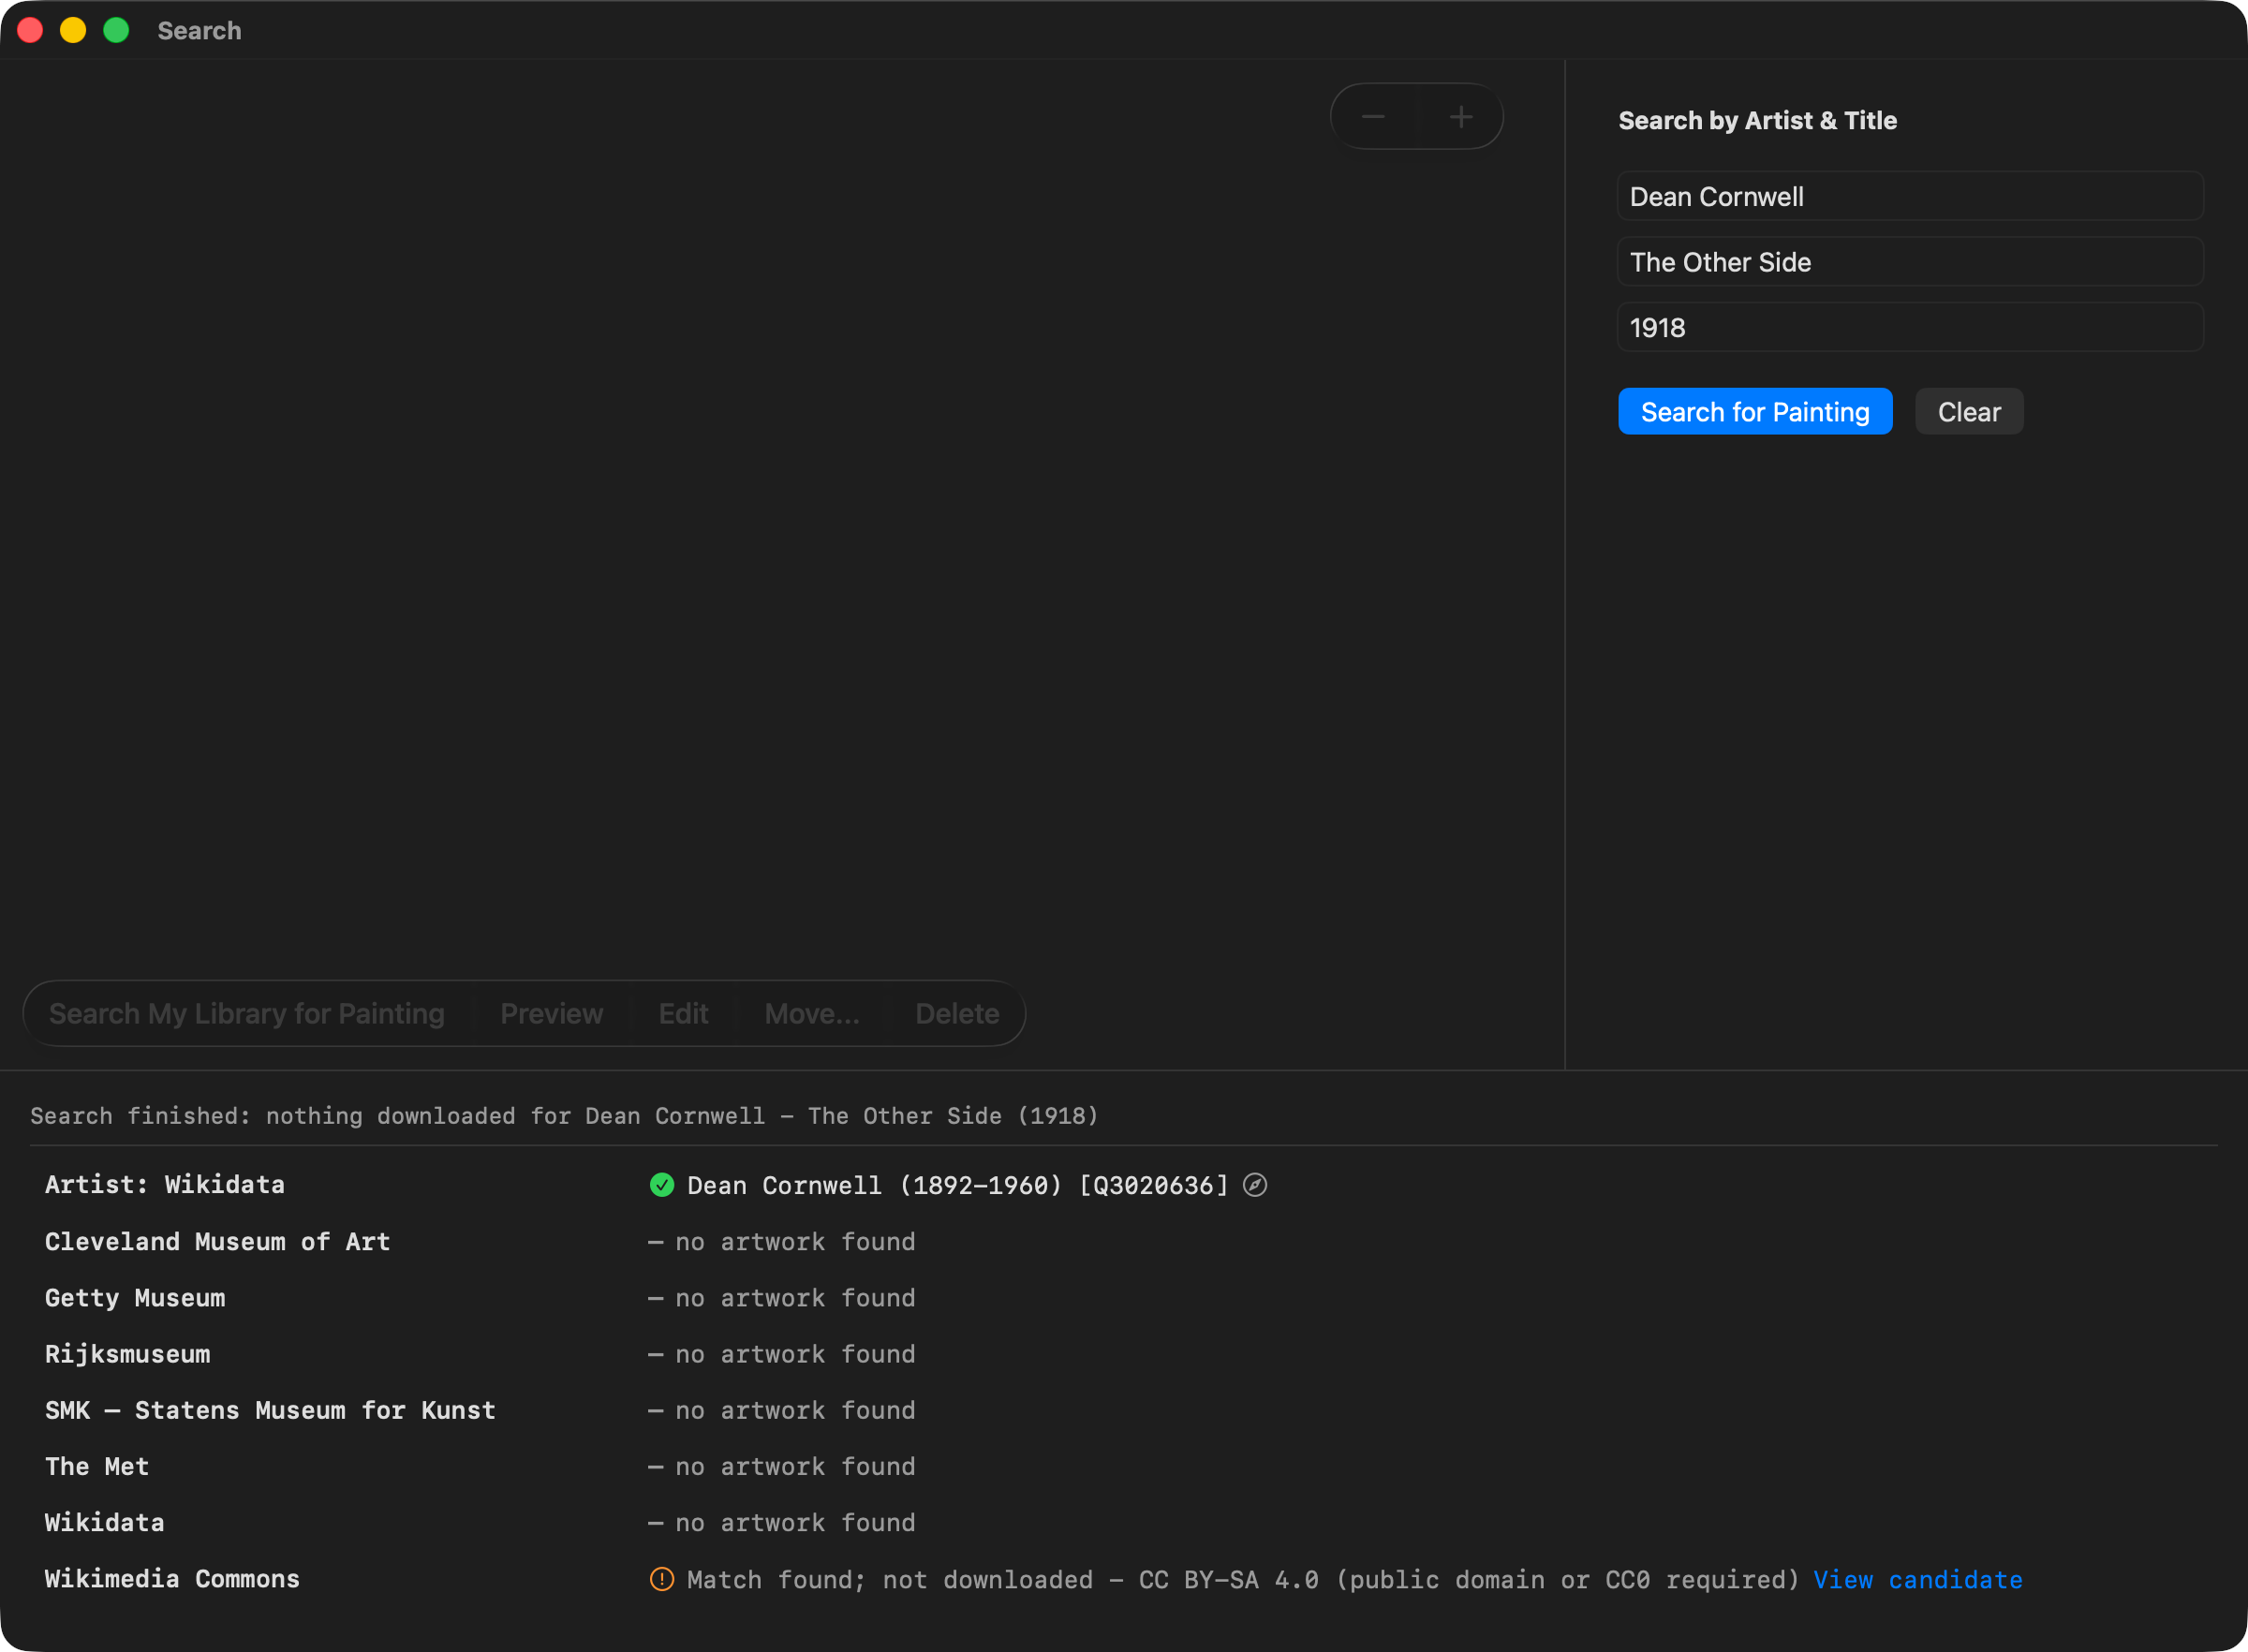
The same reason is written into that row's detailed log, so clicking the row shows which candidate was rejected and on what grounds.
That is a deliberate restriction rather than an oversight. A share-alike licence travels into whatever you make from the image, and a picture you set as a wallpaper today may end up somewhere else a year later. Restricting to public domain and CC0 means you can use the image however you like, with no strings attached. And in most cases, the very largest and best quality scans - the ones ArtFetcher exists to find - are public domain almost without exception.
Everything ArtFetcher knows about a work travels with the file. Each JPEG, TIFF and PNG is stamped with the title, the artist, the collection it came from, a link to that collection's page for the work, and the licence. Those values go in the standard IPTC and TIFF fields, in a PNG's own text chunks, and as XMP, so Preview.app, Get Info and photo software can all show them.
This is not legal advice. ArtFetcher reports what a collection says about a work; it cannot tell you what is lawful where you are. Copyright terms differ by country, a photograph of a painting may be treated differently from the painting, and some institutions attach terms of their own on top of the licence. If you intend to publish, sell or build on an image, read the source collection's terms first.
The Settings → Search tab holds the two system-wide shortcuts and what the Search gallery shows. It is there in both modes.
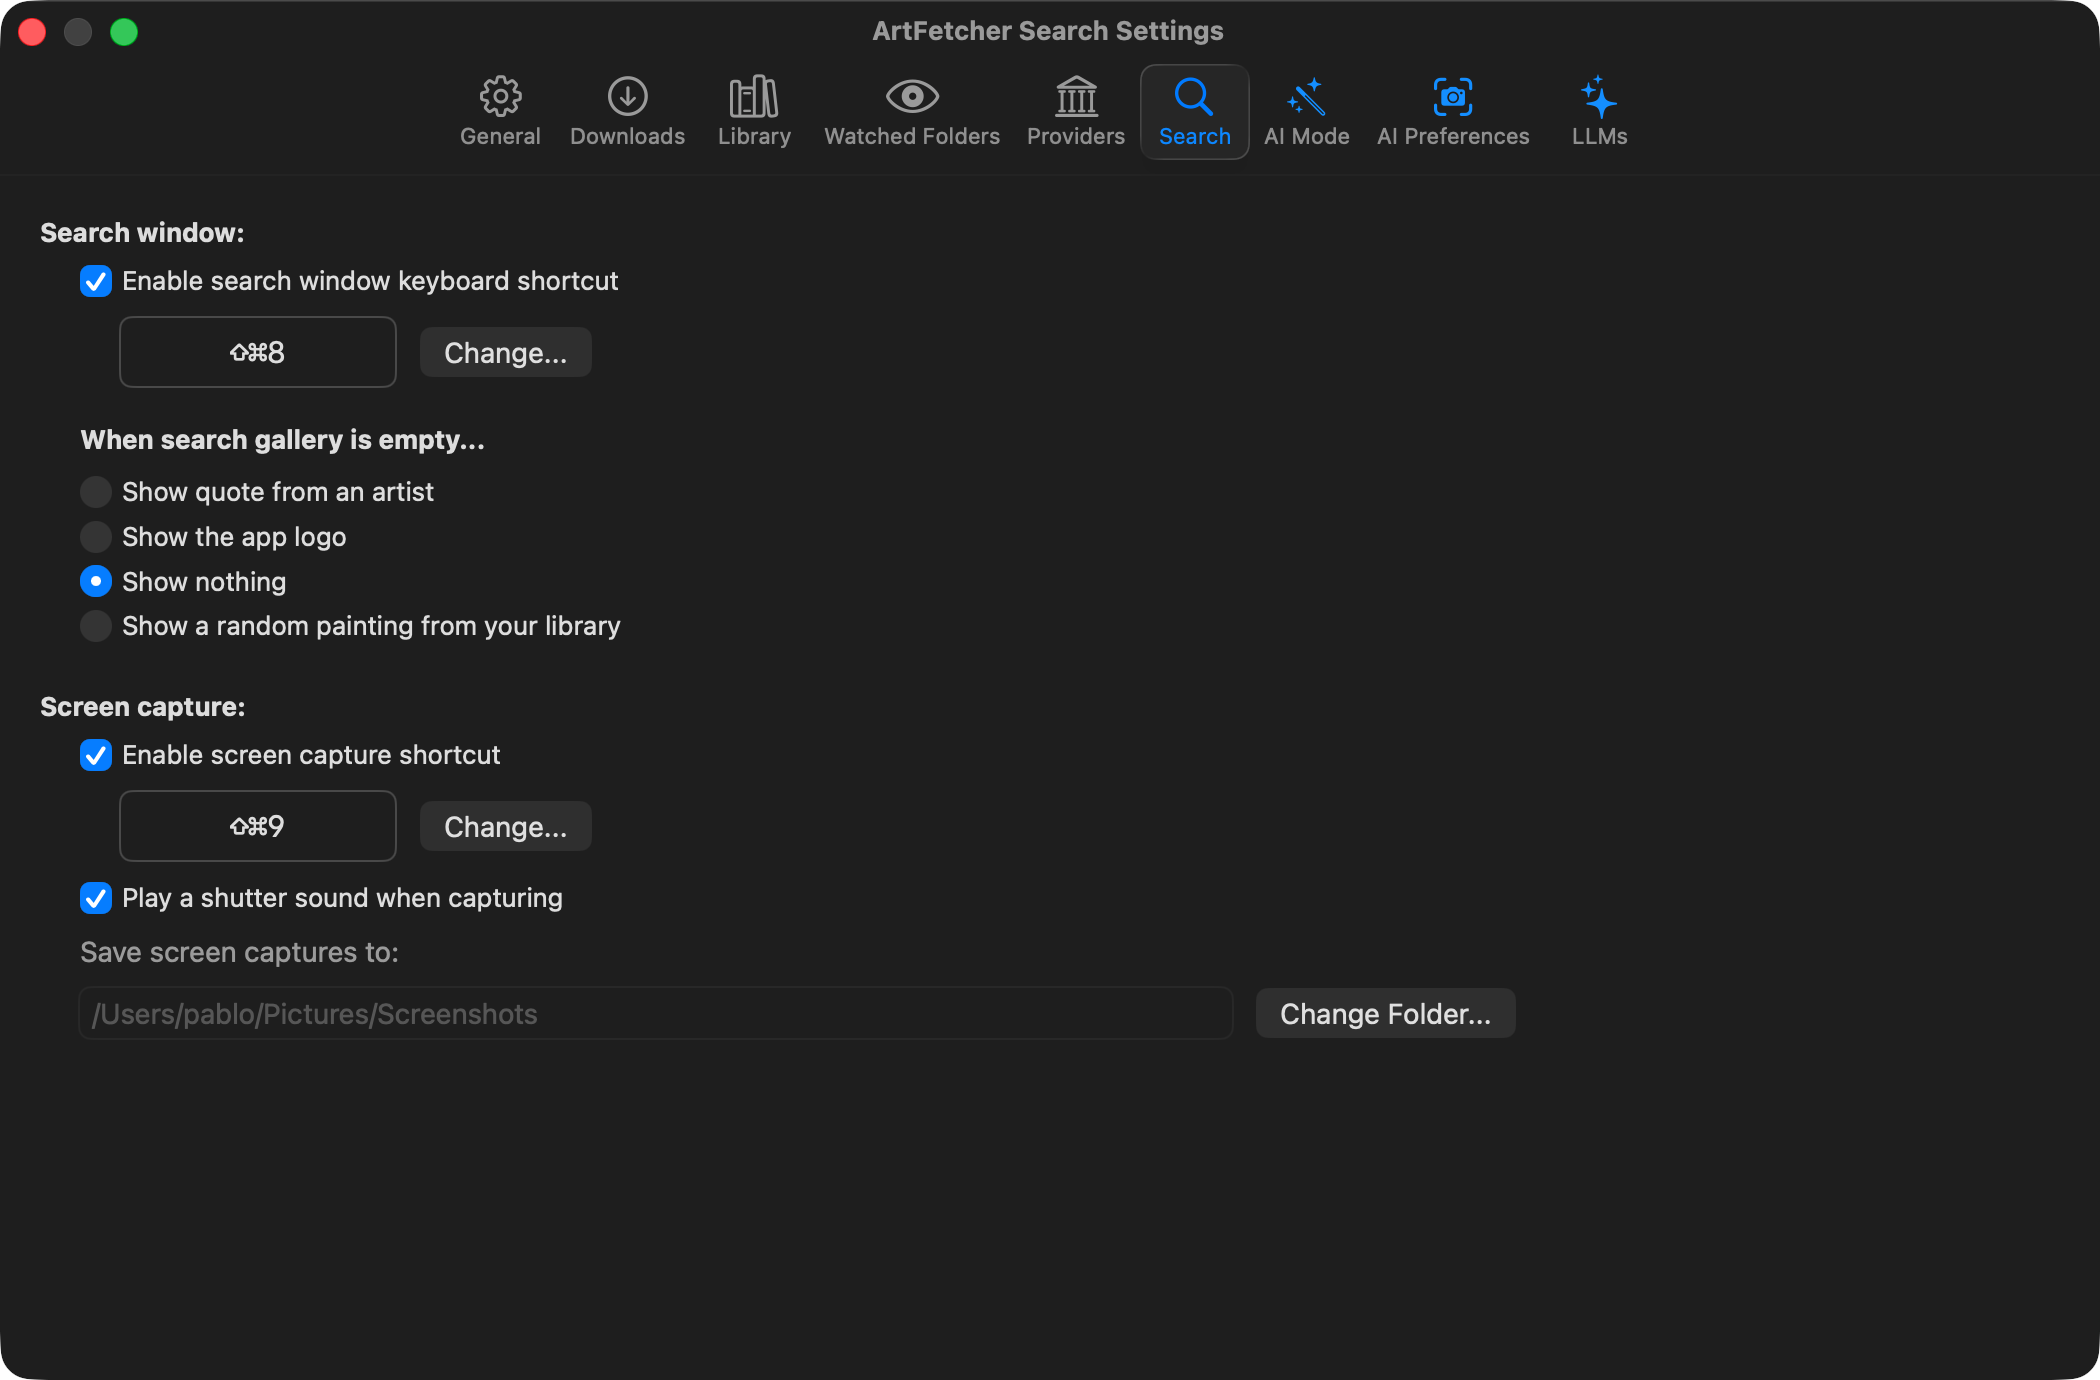
Search window holds the shortcut that opens the Search window from whatever app you happen to be in. Its When search gallery is empty... section chooses a quote, the app logo, nothing, or a painting from your library. The default is nothing; explicitly saved choices are preserved.
Below it, the section for Screen Capture holds its shortcut. Enable screen capture shortcut switches the shortcut alone: the menu bar item's Screen Capture works either way. Play a shutter sound when capturing confirms the capture happened, and the folder below it is where captures are saved.
The Settings → General tab is where you control how the app looks and works.
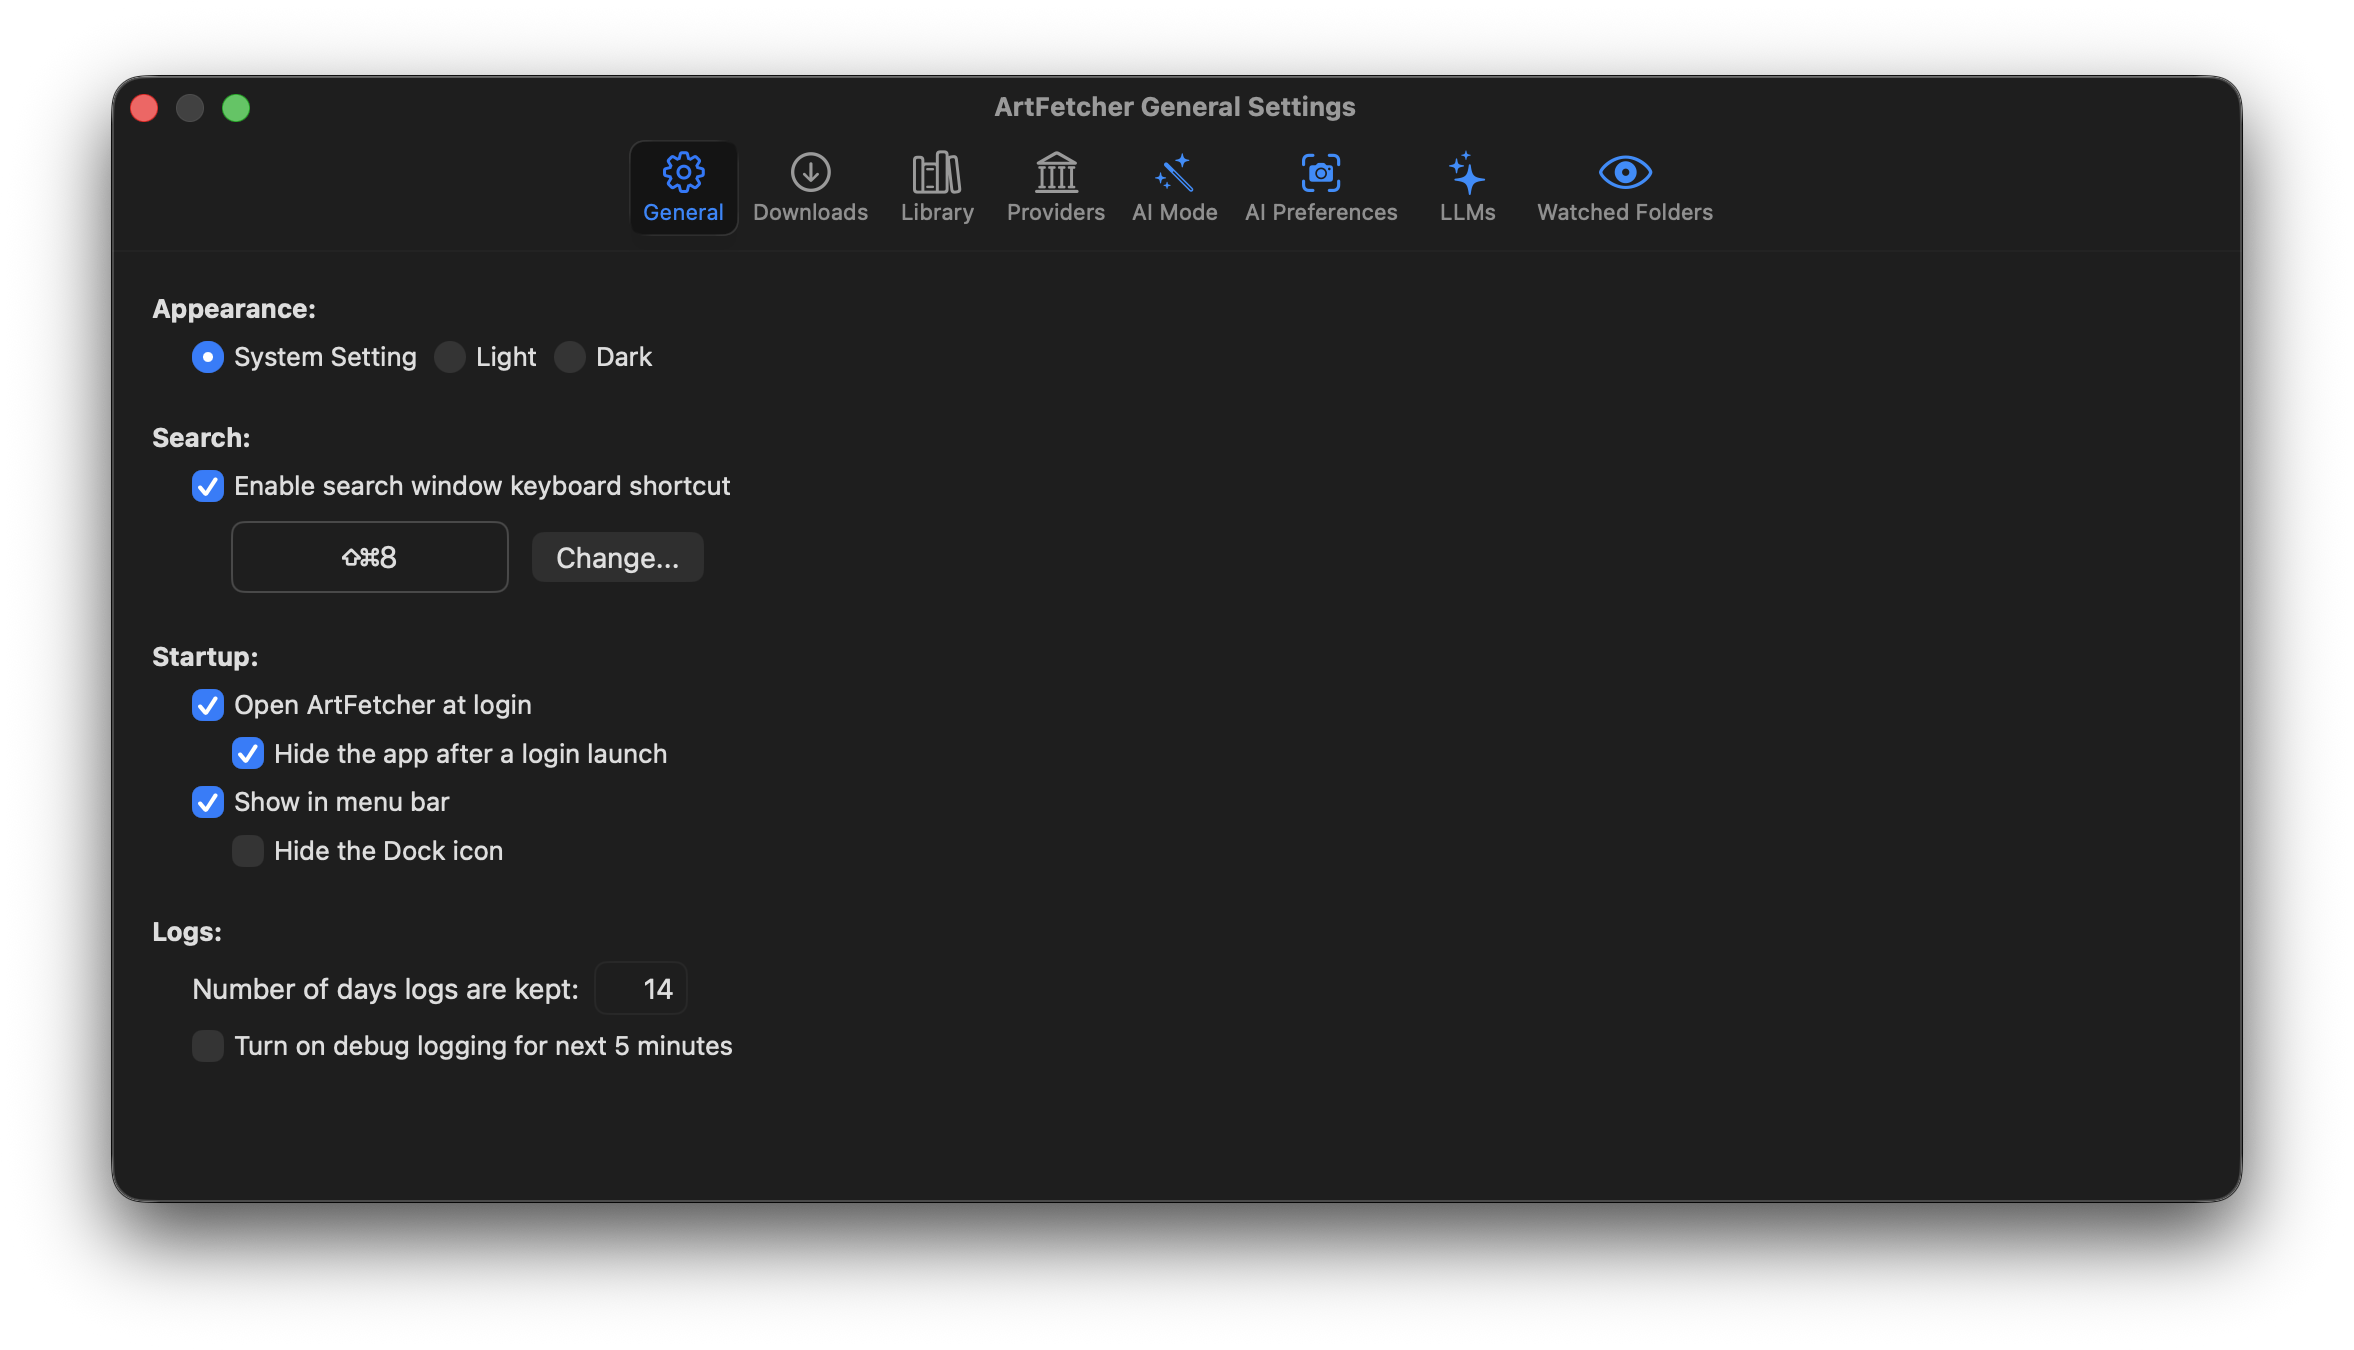
Appearance follows the system, or sets the application to light or dark mode.
Startup: opening at login is there for the Search window and Screen Capture shortcuts, which will not work unless ArtFetcher is running. Hide the app after a login launch starts it out of the way; opening ArtFetcher yourself always shows it. Show in menu bar puts a paint palette in the menu bar and switches the application into accessory mode, meaning ⌘Q only closes windows, it does not quit the application, so the ArtFetcher menu names it Close ArtFetcher Windows. Hide the Dock icon takes ArtFetcher out of the Dock and out of the ⌘-Tab switcher, leaving the menu bar item as the way back to the application. It can only be set while the menu bar item is showing, since an app with neither would have nothing left to click.
Logs are kept by ArtFetcher, with each day saved in a separate file. You can specify how many days worth of logs you wish to keep. And if you come across a bug, you can Turn on debug logging for next 5 minutes then send us the log. This helps us find and squish those bugs.
The introduction shown on first launch is always available from File → Run Onboarding. It walks through the same settings as the Settings window, and nothing it collects is saved until you press Finish. Just close the window if you want to stop.
ArtFetcher writes one log file a day, named for the date, holding everything that happened that day. The quickest way to see the log messages is inside the app - click the provider row in the status pane when something goes wrong. The complete day's log entries are under the Help menu: Open Today's Log shows it in a window that keeps up as lines arrive, Open Today's Log in TextEdit hands it to TextEdit, and Open Log Folder in Finder - or in Terminal.app - shows every day being kept.
To watch a search as it happens rather than read it back, View Live Log… opens on the last three minutes and follows the file from there. Press ⌘K to clear what is on screen when you want a fresh start for the next run; the log file itself is untouched, and Open Today's Log still has every line.
The searches to all the providers run in parallel, so the log file shows all those messages interleaved.
Every line begins with the date, the time, and a four-letter tag naming what
wrote it - ANCL for Claude, WKMC for Wikimedia
Commons, STAT for Statens Museum for Kunst, and so on - so
searching the file for one tag pulls out that one thread.
Logs are kept for a certain number of days and then deleted at the next launch. Settings → General sets how many days to keep.
You can also Turn on debug logging for next 5 minutes,
which adds a great deal more to the day's file: the collections' raw replies,
and the score of every candidate they offered. Switch it on, reproduce whatever
went wrong, then read the log - the extra lines are marked
debug. It unticks itself when the five minutes are up, so it cannot
be left on by accident. The Live Log window carries the same switch as a
Debug logging button, counting down the minutes it has left, so
the extra lines can be turned on without leaving the log you are watching.
Identifying a painting from a picture of it - what the feature does, what it costs, and what leaves your Mac.
ArtFetcher needs an artist's name and a title, something you already know. AI Mode is for when you don't: you might have a photograph, a screenshot or a scrolled-past image, and no idea who painted it.
Give ArtFetcher the picture and it uploads it to an AI service of your choosing - Anthropic, OpenAI or Google. These AI services use Large Language Models (LLMs) to determine the name of the artist and the painting's title. From there the ordinary search runs: the collections are asked for a high-resolution version, and the results arrive in the same window as always.
LLMs can make mistakes, so if a search fails you should check the results they returned.
Three things are worth being clear about before you switch on AI Mode.
The rest of the app works without AI Mode, and it is off until you turn it on.
Open ArtFetcher → AI Mode, read the summary, and click the switch. The same switch lives in Settings → AI Mode.
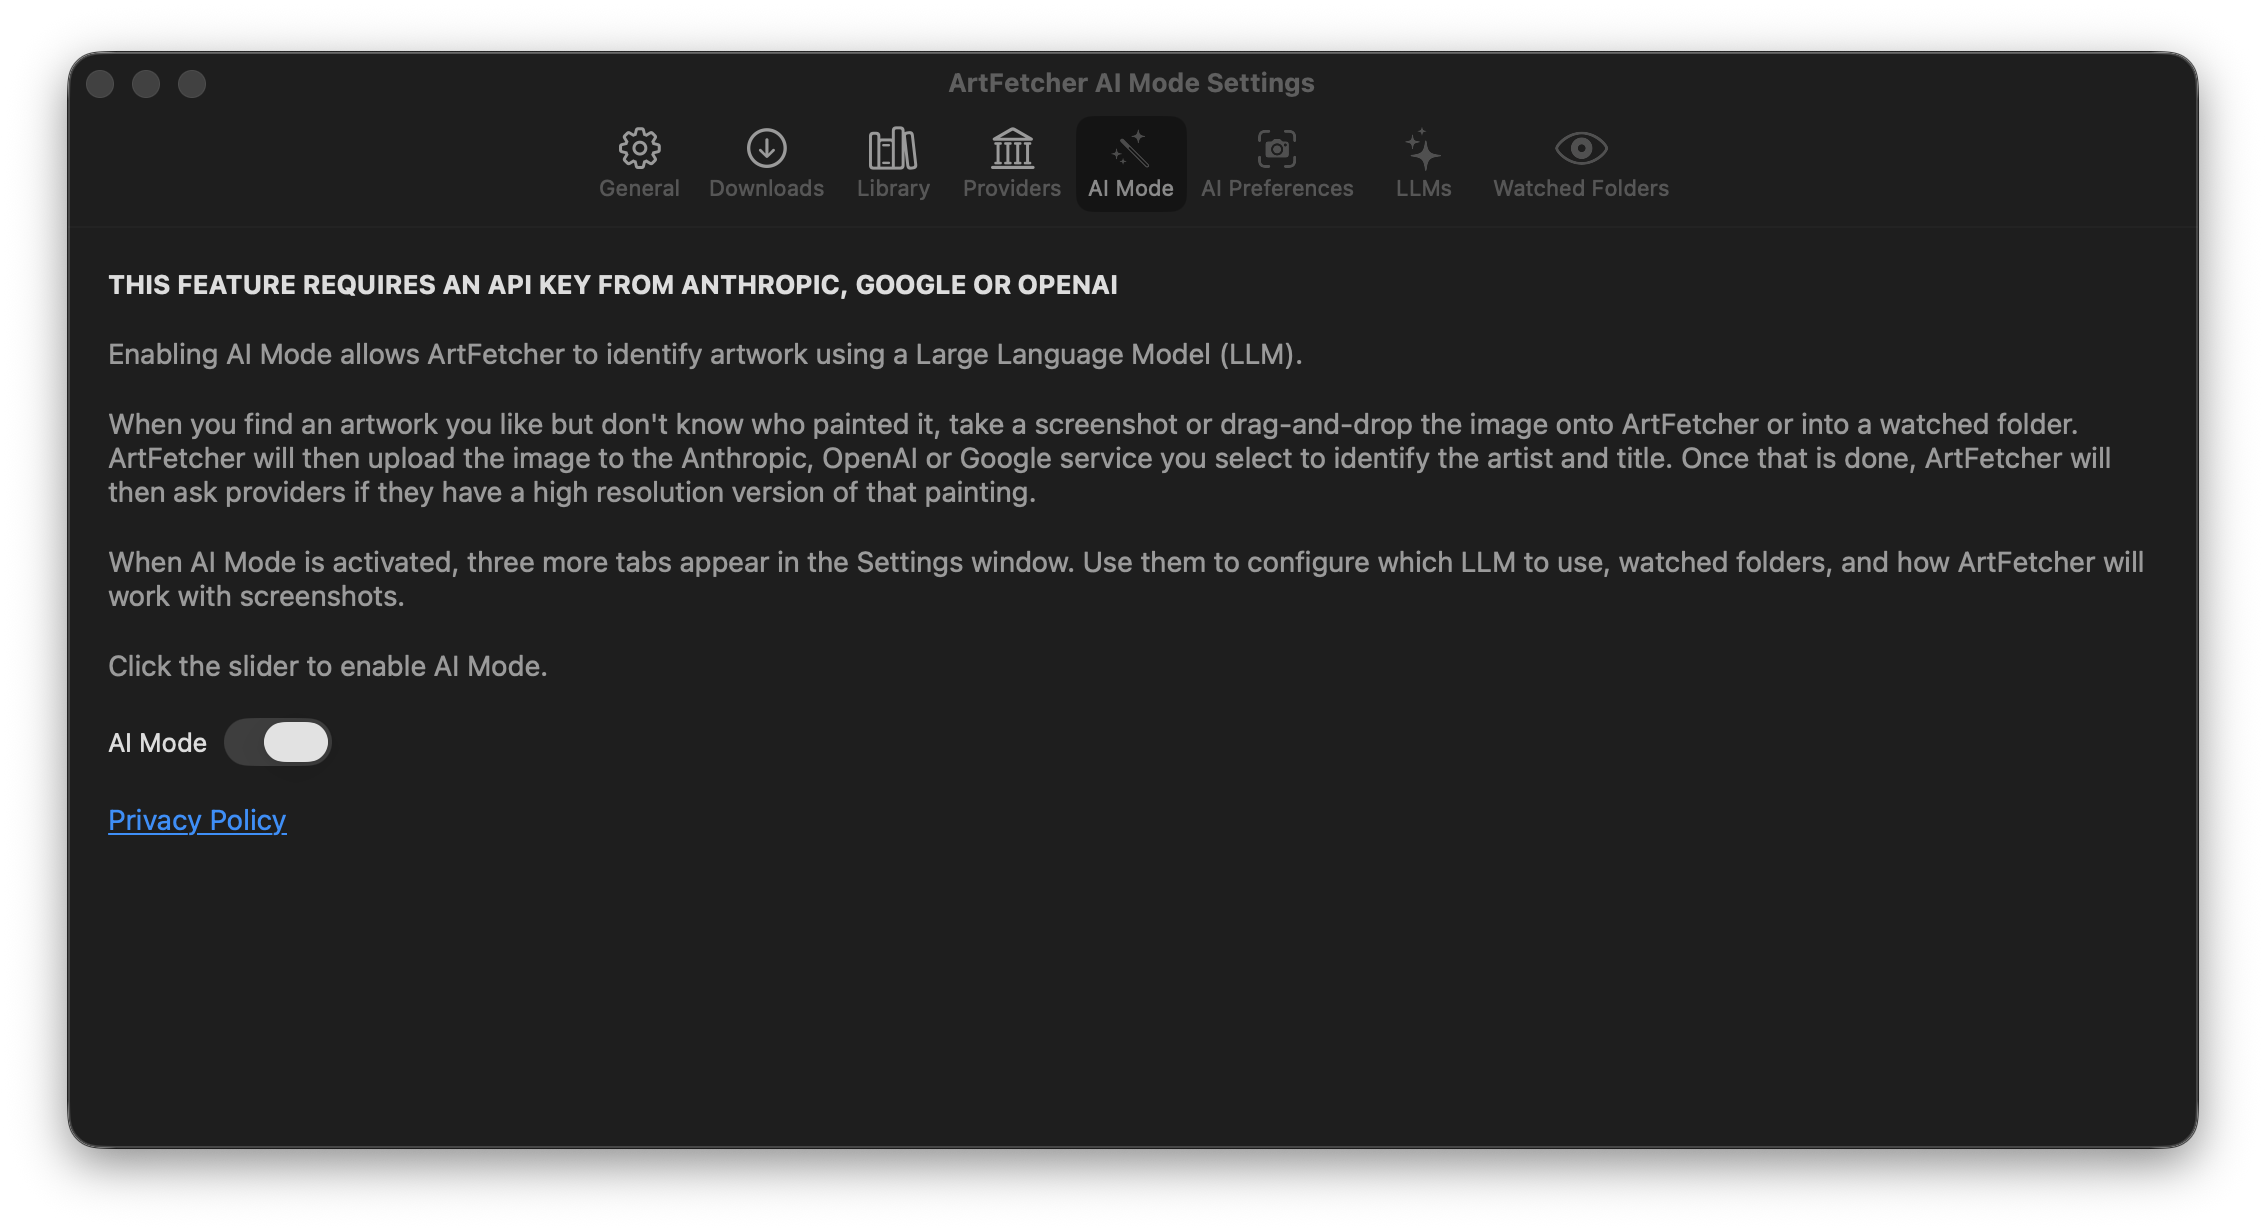
Turning on AI Mode changes the app in three visible ways:
Turning off AI Mode removes those AI features. The Search and Search Results windows work as before.
Settings → LLMs lists the three supported services. Selecting a row shows what that service is; the radio button in the pane is what actually turns it on.
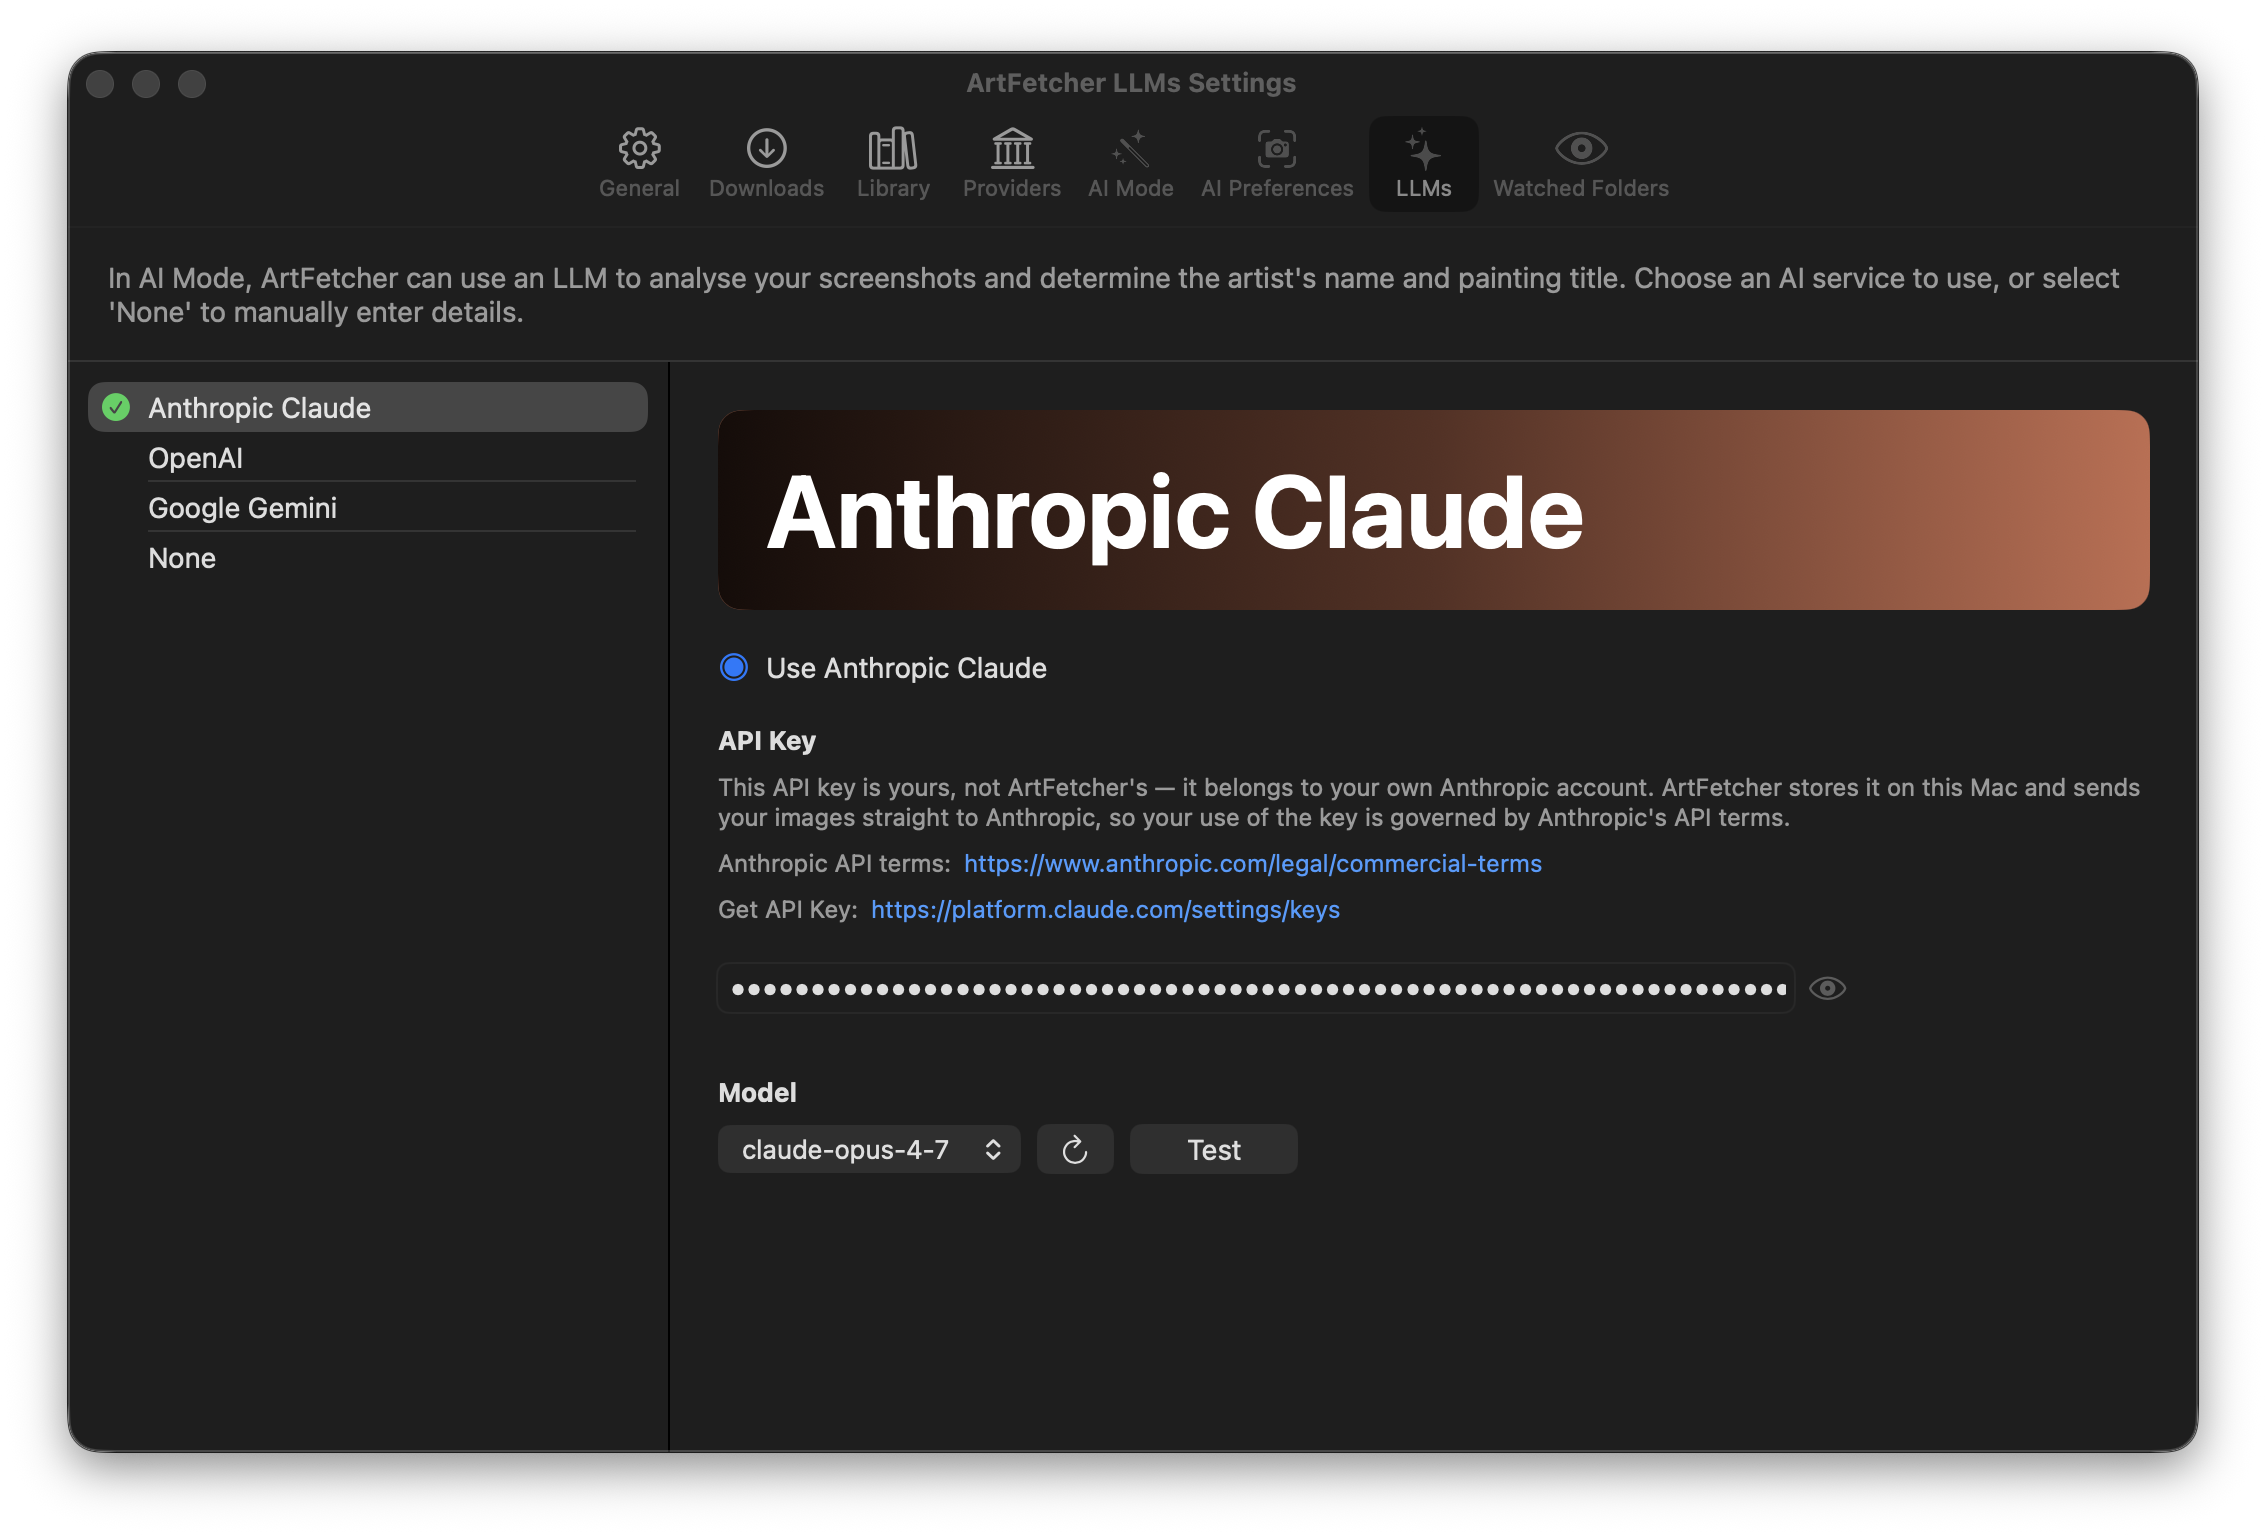
Each service's pane links to the page where that company issues API keys and to its API terms, which you are asked to acknowledge once before the key is used. Paste the key into the field then pick a model and press Test to confirm the key works. The refresh button re-reads the list of models the service currently offers.
Your key is stored on this Mac, in ArtFetcher's own settings file inside its sandbox container. It is sent to that company and to nobody else, and never to the developer.
Until a service is chosen, AI Mode identifies nothing: a search stops after checking your library, and the status line asks you to choose one. If you want the picture workflow without the uploads, turn AI Mode off and type the artist and title in the Search fields yourself.
Select a picture in the gallery and press Identify with AI. The Identifier row in the status pane reports what the AI service made of the image. When the LLM determines the artist and title, ArtFetcher will automatically fill in the search fields for you to press Search for painting.
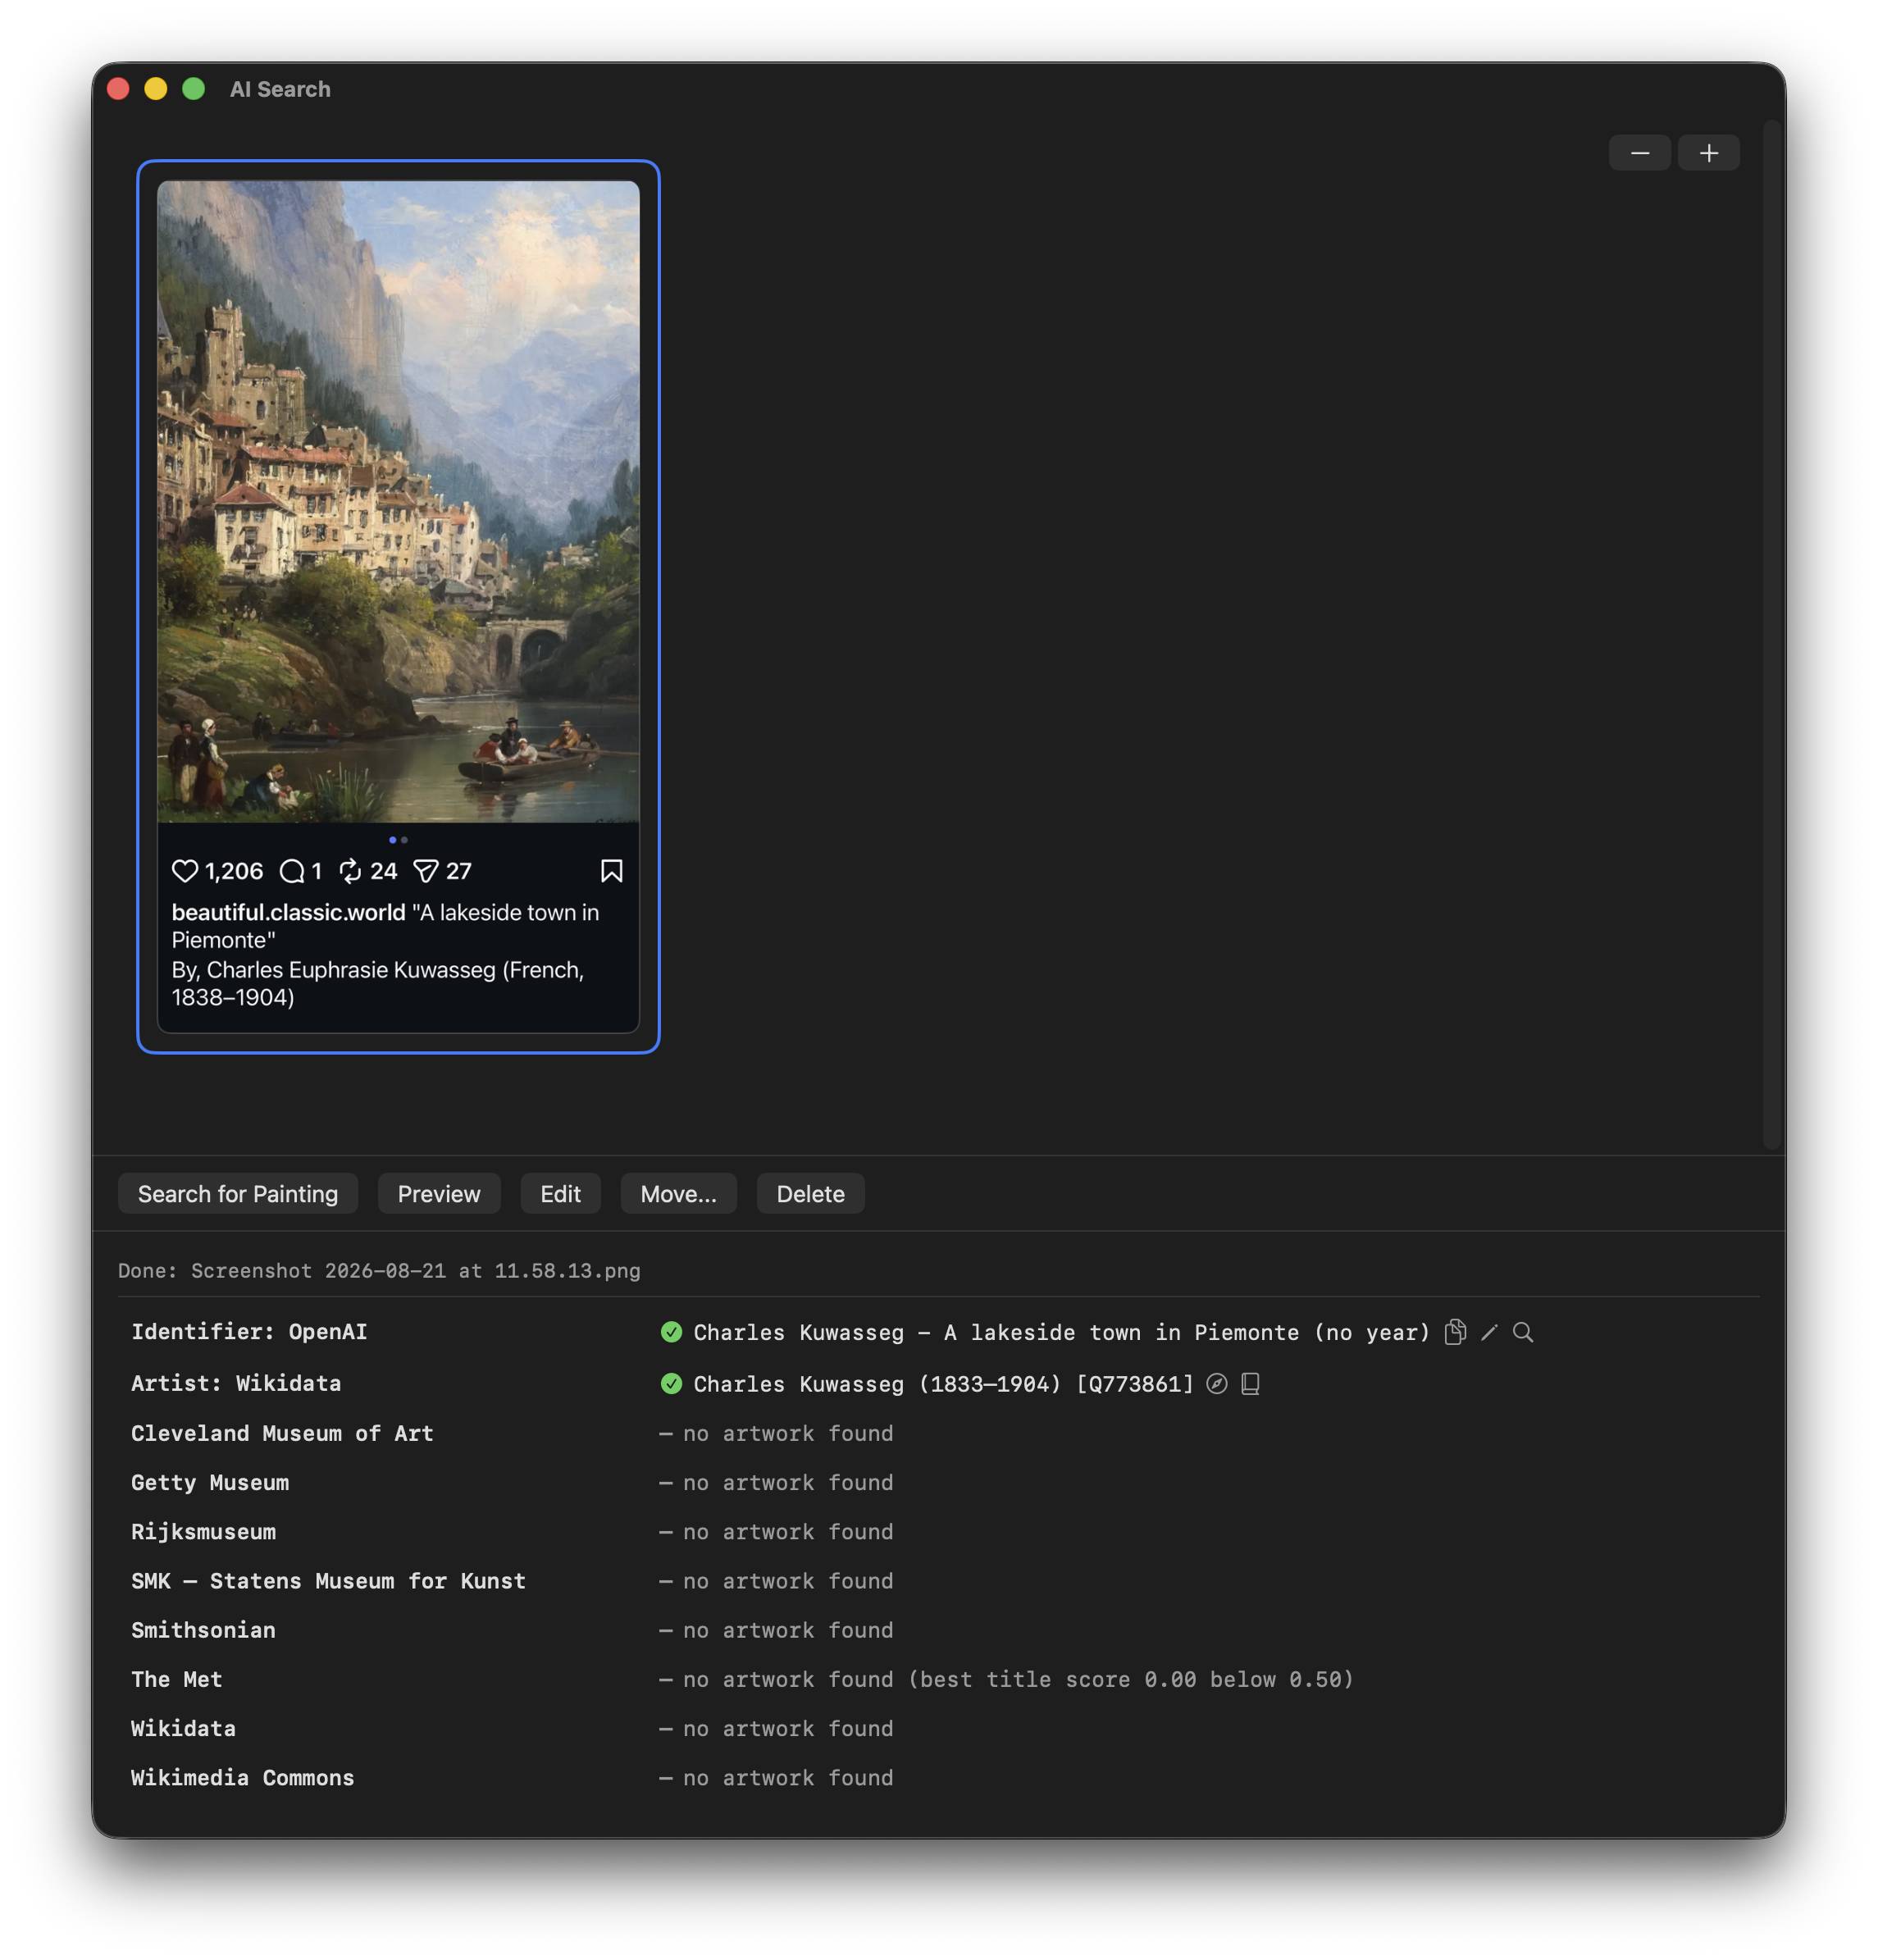
Once a painting has been identified, and before its providers are searched, ArtFetcher checks your library folders for it by filename, as it does before every search. See When you already own the painting.
An AI service's LLM can misname a painting, return a partial answer, or decline altogether - and it can be confidently wrong. If the LLM gets it wrong, you can give it a helping hand. In the Identifier row after the painting title are two clickable glyphs:
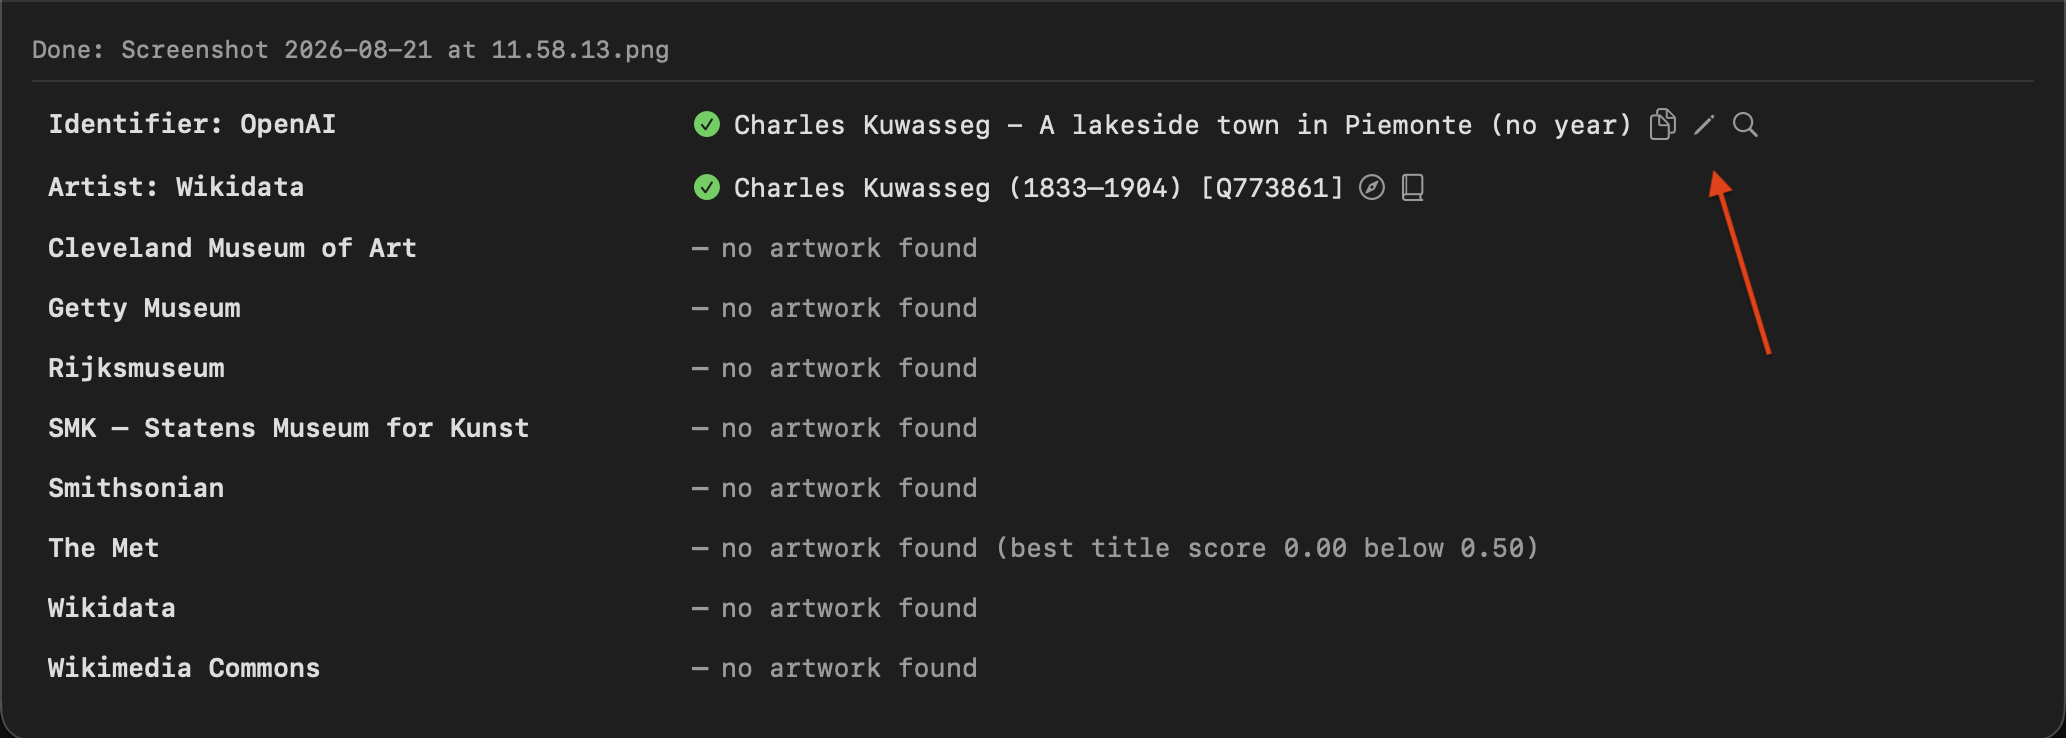
The identification also fills the Search fields. To correct it, edit the artist or title there and click Search for Painting.
If nothing is identified at all, the usual causes are a picture that is mostly frame, wall or reflection, a heavy crop, or a painting obscure enough that the model has never seen it. Recapturing the painting alone, tightly, is the fix that works most often.
AI Mode adds options to speed up the process of identifying and downloading a painting. You can find these in Settings → AI Preferences:
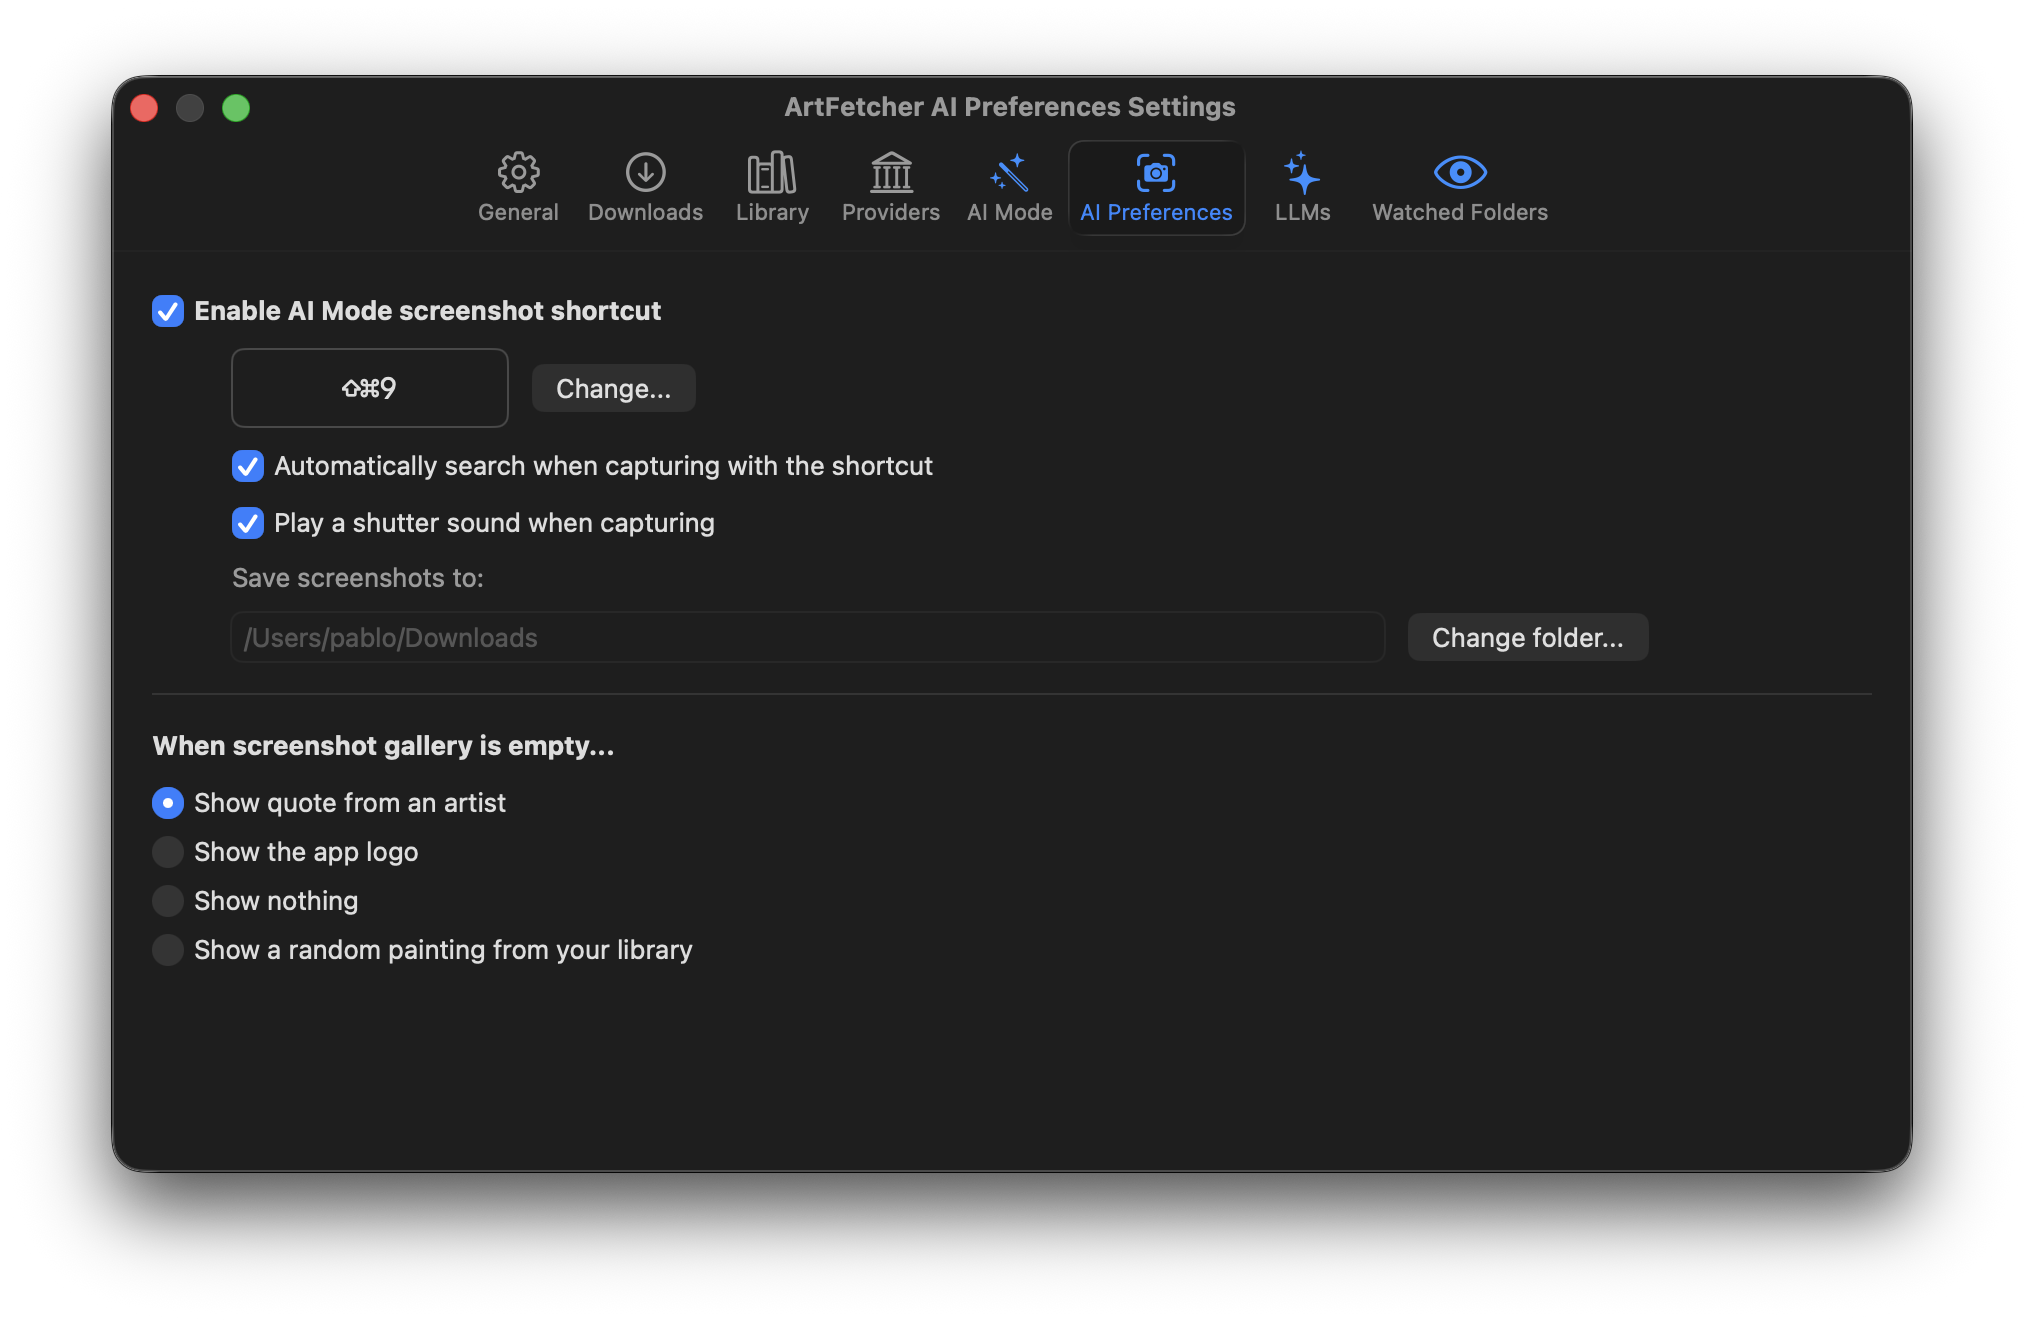
When all these options are unselected, ArtFetcher will operate the same way it does when AI Mode is disabled. Turn on these options and you can automate the steps you would perform manually:
By enabling all the above options, ArtFetcher will go from taking a screen capture to performing the visual search, calling the AI's LLM, then searching the providers, all automatically without you having to perform those steps yourself.
With AI Mode off, ArtFetcher only sends the artist's name, painting title and year to the providers' collections. It doesn't send anything else anywhere else.
With AI Mode on, one thing changes: when you ask for a picture to be identified, that picture is uploaded to the service you selected, as well as your API key and a prompt to the LLM asking it to identify the painting. That is the only upload, and it happens only when you start an identification.
An upload cannot be taken back. What the company keeps, and for how long, is governed by their terms, not by ArtFetcher - the LLMs tab links to them for each service. ArtFetcher itself has no account, no analytics and no telemetry, and sends nothing to its developer. The privacy policy sets all of this out in full.
ArtFetcher charges nothing for AI Mode and takes no part in the billing. Each identification is one request to your own account with Anthropic, OpenAI or Google, priced by them, and it is a single image and a short answer - small, but not free. Set spending limits in that account if you want a ceiling; ArtFetcher cannot see or enforce one.
Identifying the same picture twice does not cost twice. An LLM's answer is remembered against the file itself, so clicking Search for Painting again about a picture that has not changed costs nothing because the LLM is not asked again. Editing the picture, or switching to a different AI service, discards what was remembered and so another API call will be made.
Switch it off in ArtFetcher → AI Mode or Settings → AI Mode. The AI windows close, the two extra Settings tabs disappear, a screen capture is no longer searched automatically, and no image can be uploaded again until you turn it back on. Your API keys stay where they are, so if you switch on AI Mode again you won't have to copy/paste them back.